Web Workflow
In this workflow, you will explore recording a video or capturing images using a mobile device and then upload the captured data into EdgeFirst Studio for annotation and then model training, validation, and deployment using the PC. This workflow requires the user to have signed up and logged in to EdgeFirst Studio and followed the initial steps described in the Getting Started with EdgeFirst Studio.
Capture with a Phone
The examples below will show video recording and image captures of coffee cups using a phone for training a Vision model that detects coffee cups. However, you can choose any type of objects in your dataset.
Data Usage
It is recommended to use a phone connected to a Wi-Fi network. A device connected to mobile data might be subject to intense usage when uploading files; video files or image files can be large in size. In the examples below, the video file used was ~15MB and the image files were ~2MB each.
Limited Datasets
The example below uses a small video recording and only a handful of images. While this is sufficient for demonstrating the workflow, training a model on a limited dataset will typically result in poor performance when deployed in real-world conditions that differ from the training samples.
To improve model robustness and generalization, it is recommended to collect training data across a variety of conditions, backgrounds, lighting environments, and object variations. As a general guideline, a minimum dataset size of approximately 1,000 images or video frames is recommended, although the optimal size depends on the complexity of the task.
Device UI May Vary
The video and image capture screenshots shown in this guide were taken on a Samsung smartphone. Camera app layouts, button locations, labels, and available options may differ on other devices and operating system versions. For device-specific steps, refer to your phone manufacturer documentation or device manual.
Record Video
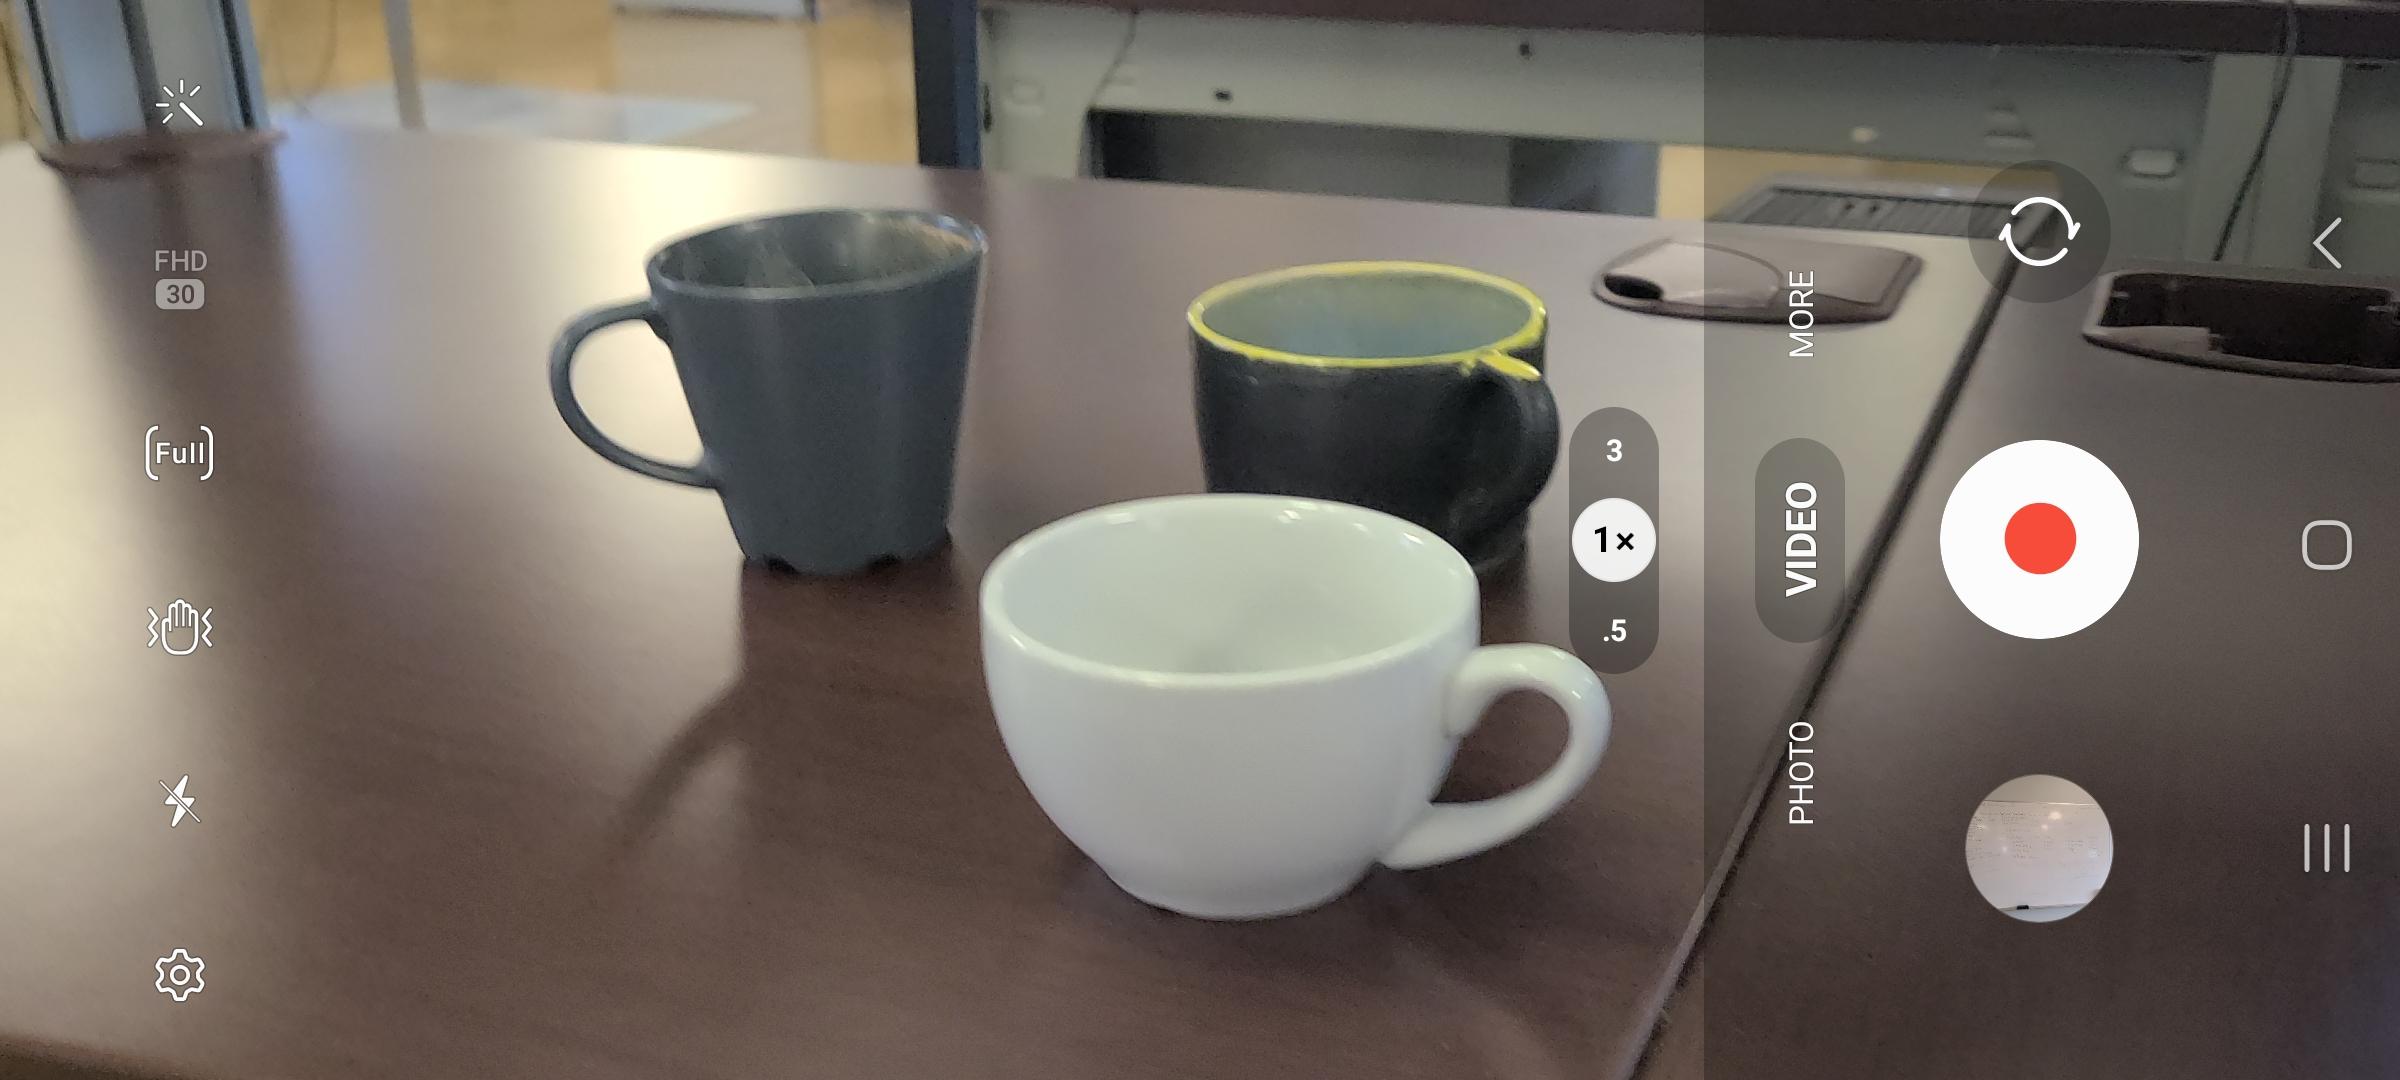
Using a smartphone, try to record a 30 second or more video with the camera application showing various orientations of coffee cups. Typically, the video recording can be started by pressing the red circular button. The video can be stopped by pressing the same button again.
Capture Images
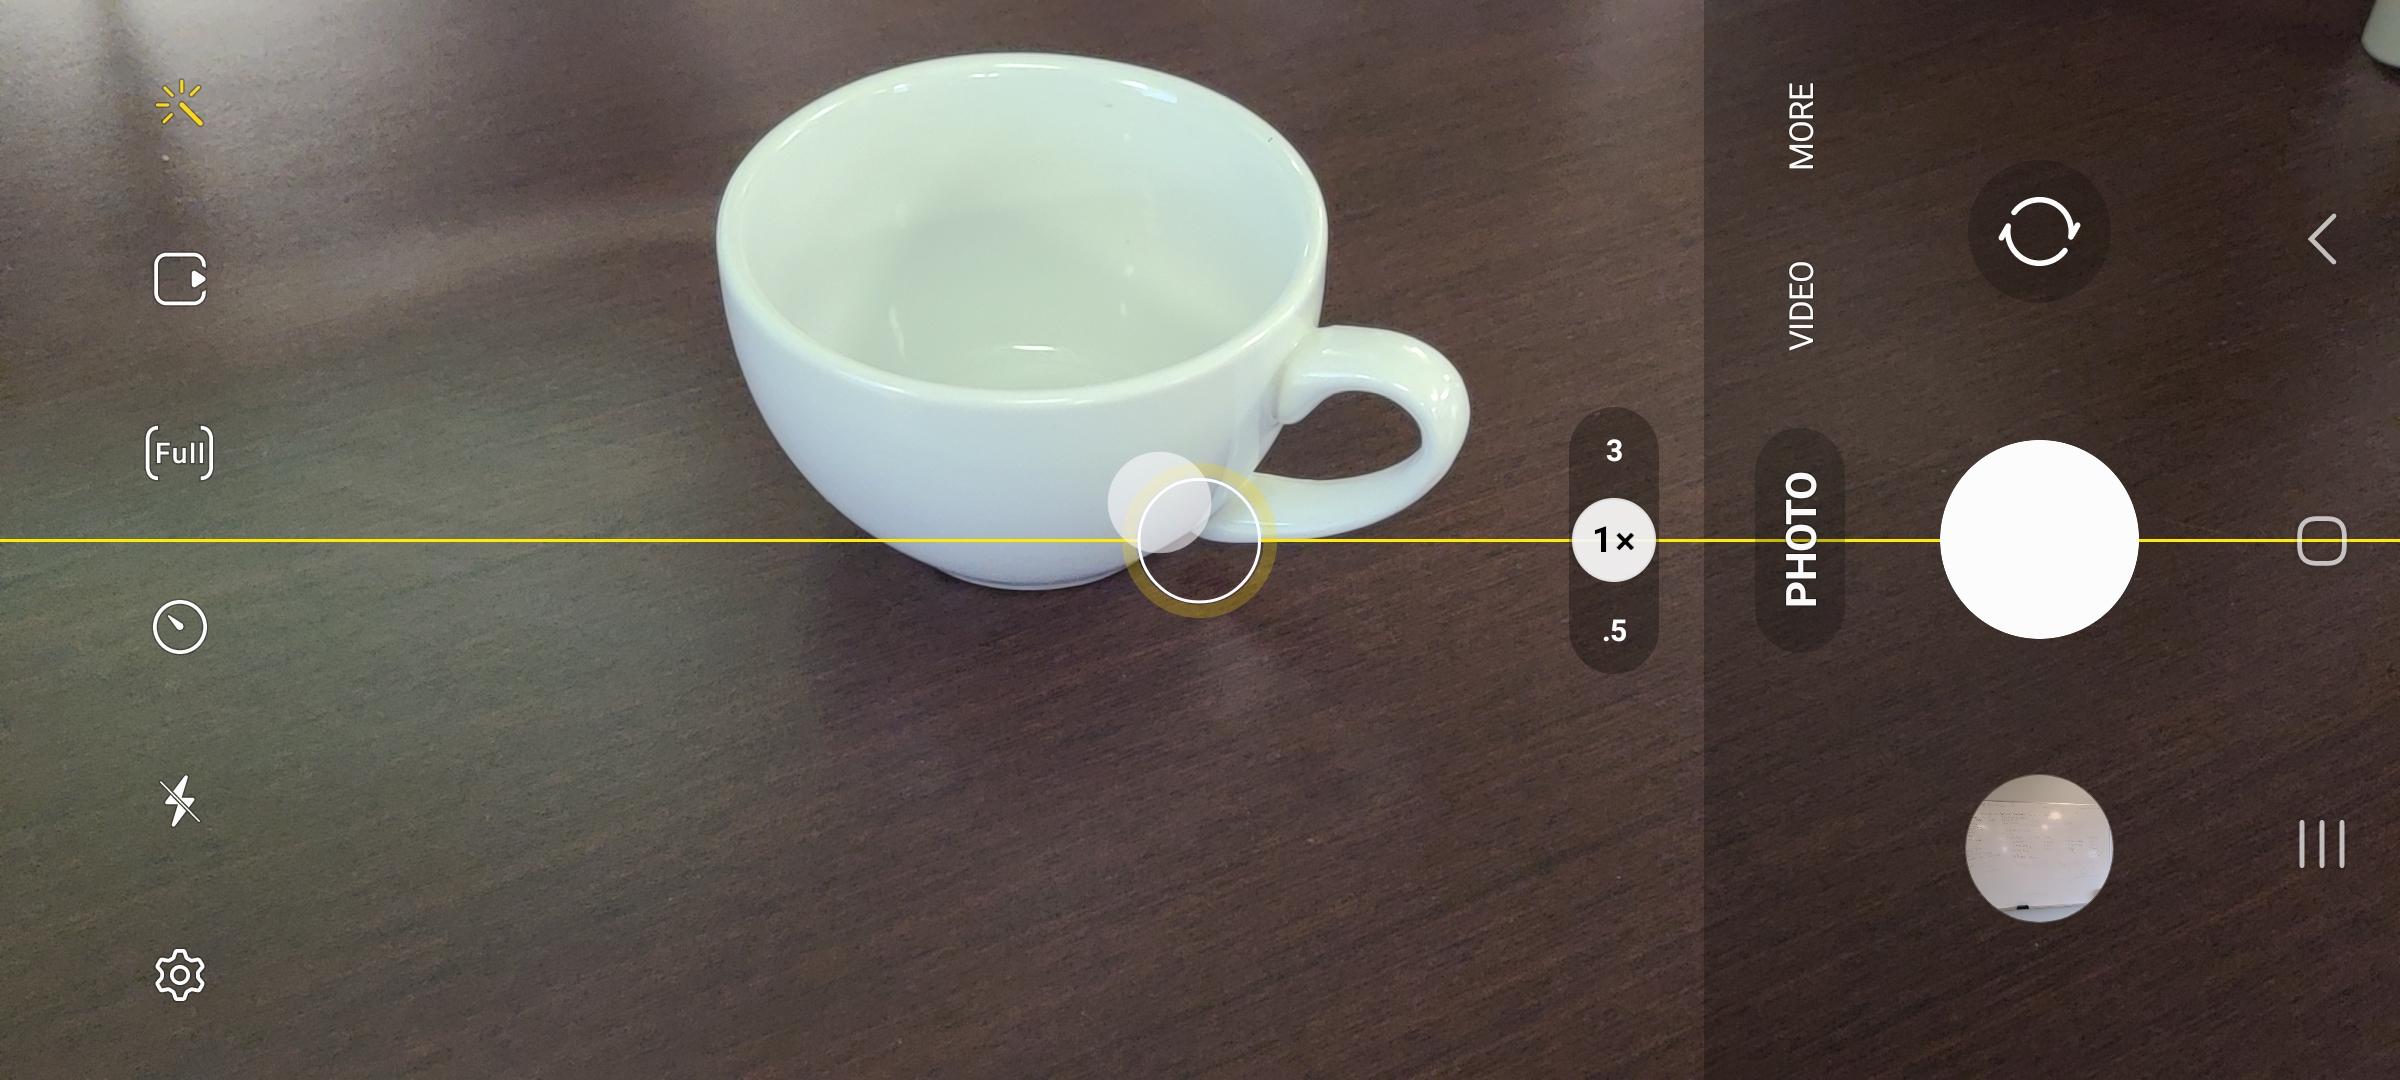
Furthermore, you can also capture individual images as shown below. You can take image snapshots from the camera by pressing the white circular button.
Leveraging Videos
It is recommended to use videos rather than individual images. This is because the Automatic Ground Truth Generation (AGTG) feature leverages SAM-2 with tracking information which only needs a single annotation to annotate all frames. However, individual images requires more effort by annotating each image separately.
Create Dataset
If you have a video recording or sample images for your dataset, you can create a dataset container in EdgeFirst Studio to contain your video frames or images and annotations.
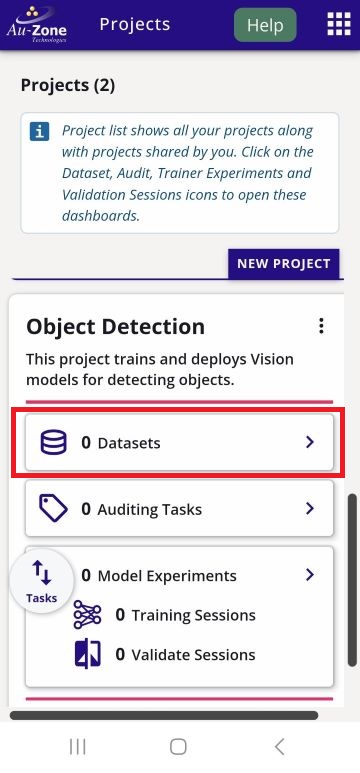
Navigate to a web browser and login to EdgeFirst Studio. Once logged in to EdgeFirst Studio, navigate to your project. In this case the project name is "My First Project". Click on the "Datasets" button that is indicated in red below.
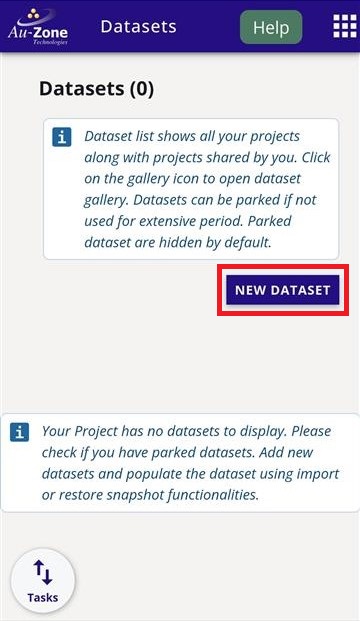
This will bring you to the Datasets Dashboard of the selected project. Create a new dataset container by clicking the "Actions" dropdown on the top right and then click the "New" button that is indicated in red.
Enter a name for the dataset and annotation container, specify the labels, and provide a dataset description in the fields shown below. The values are entirely up to you and do not need to match the example. Once all required fields have been completed, click "Create" to create the dataset.
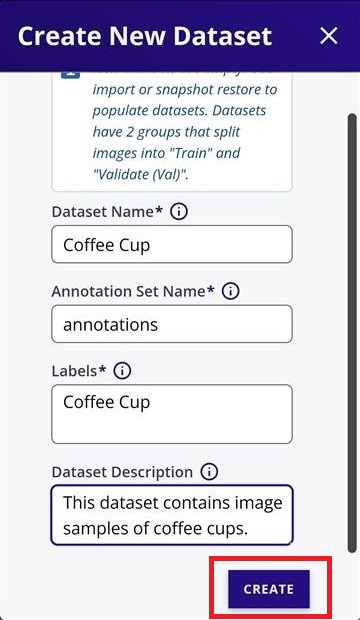
Your created dataset will look as follows.
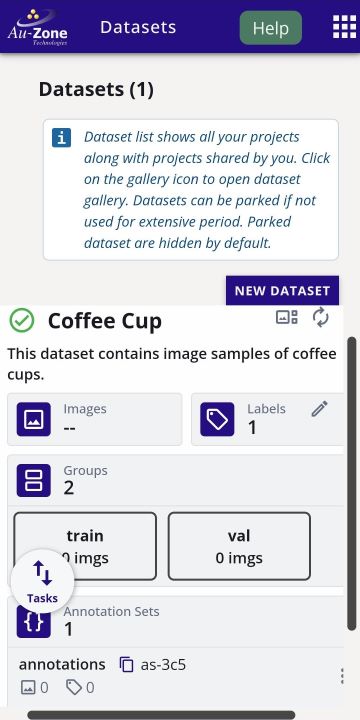
Upload Video
Video files can be uploaded into any dataset container in EdgeFirst Studio. Choose the dataset container to upload the video file. In this case, the dataset is called "Coffee Cup". Click on the dataset context menu (three dots) and click "Import".
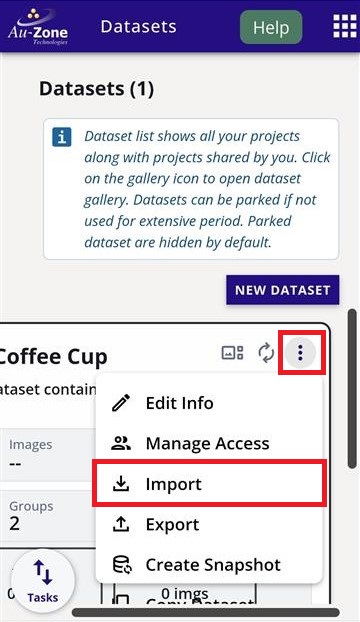
This will bring you to the "Import Dataset" page.
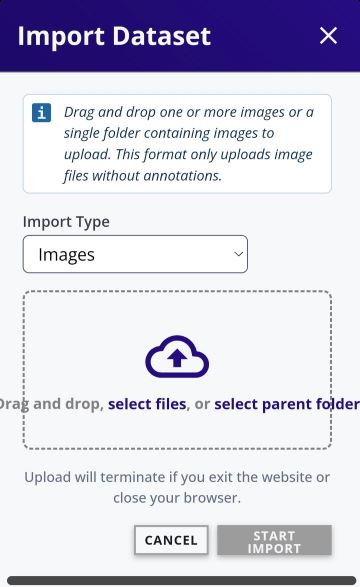
Click on the drop-down that says "Import Type" and then specify "Videos" and then click "Done" as shown below.
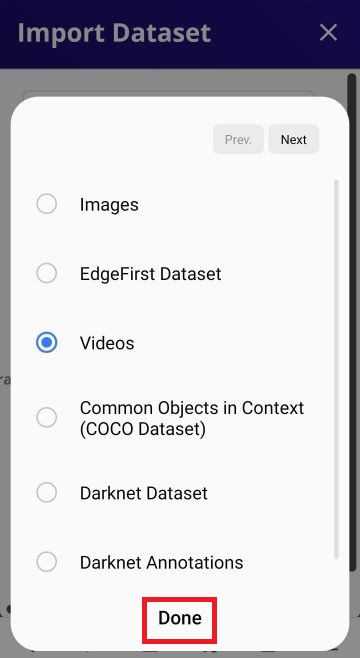
Now that the import type is specified to a "Videos", click on "select files" as indicated.
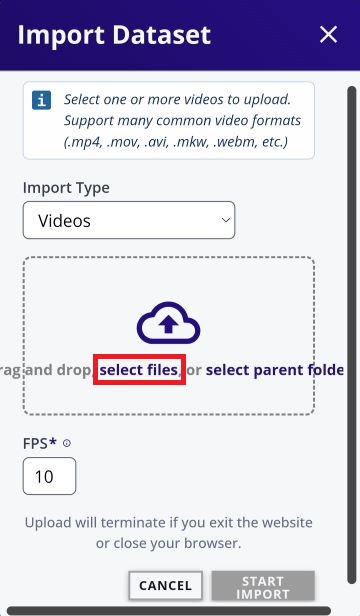
On an android device, this will bring up the option to specify the location of the files.
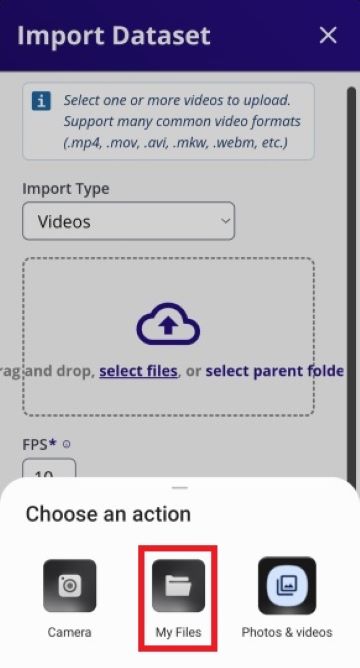
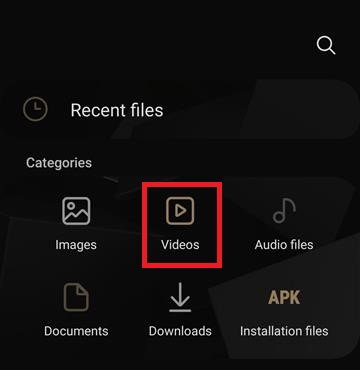
In my current setup, I have selected "My Files" from the options above and then "Videos" which will allow me to pinpoint the location of the video I have recorded.
After selecting the video file, the FPS (frames per second) value is automatically set to 1 by default. You may adjust this value to match your desired frame extraction rate. When ready, click Start Import to begin importing the video.
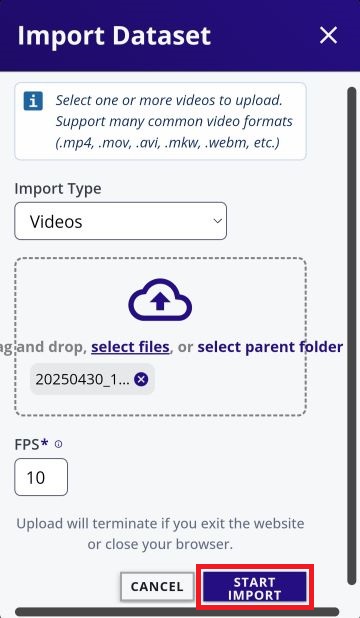
This will start the import process. For a 30-second video, the import typically takes about 2 minutes to complete.
Once the import finishes, the number of images in the dataset should increase to reflect the newly imported frames. If the dataset does not appear to update, refresh the browser to view the latest changes.
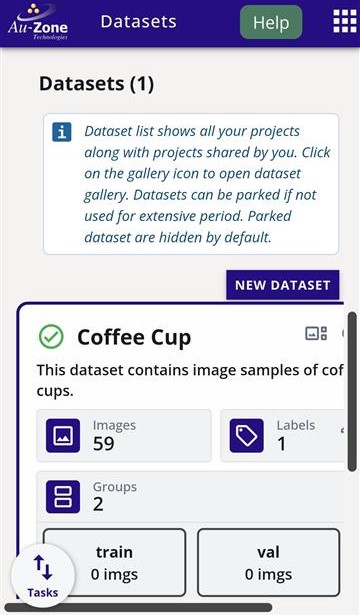
Upload Images
HEIC is not fully supported
Apple devices capture HEIC image formats by default. This format has not been fully supported yet in EdgeFirst Studio. Please make sure to use JPEGs, JPGs, or PNGs for uploading images to EdgeFirst Studio.
Image files can be uploaded into any dataset container in EdgeFirst Studio. Choose the dataset container to upload image files. In this case, the dataset is called "Coffee Cup". Click on the dataset context menu (three dots) and select import.
This will bring you to the "Import Dataset" page.
Click on "select files". This will bring up the option to specify the location of the files.
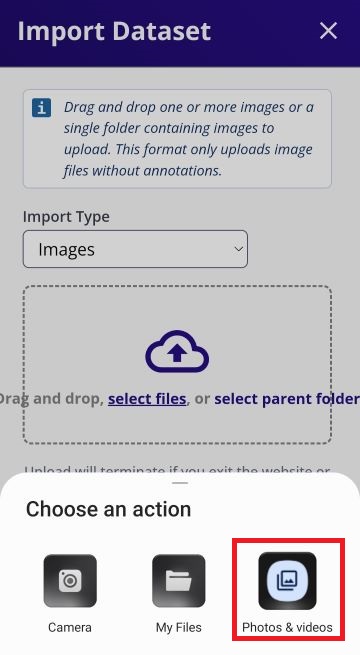
In my current setup, I have selected "Photos & Videos" from the options above and then I have multi-selected the images I want to import by press and hold on a single image to enable multi-select. To import, I pressed "Select".
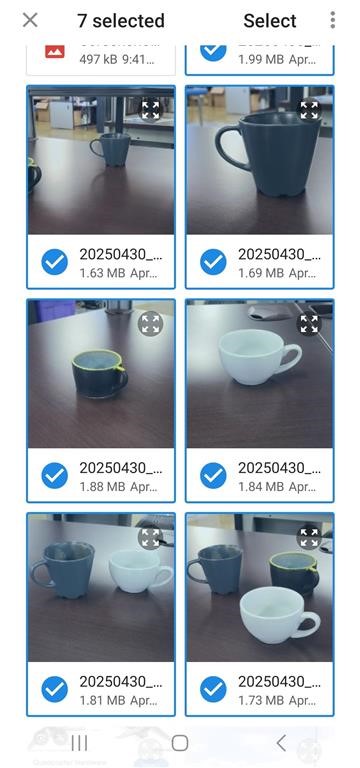
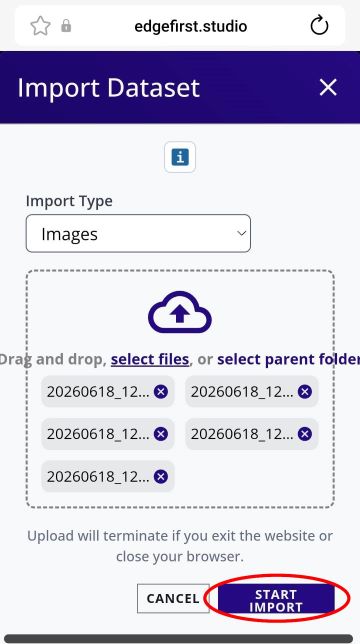
Once the image files have been selected, click on "Start Import" to start the import process.
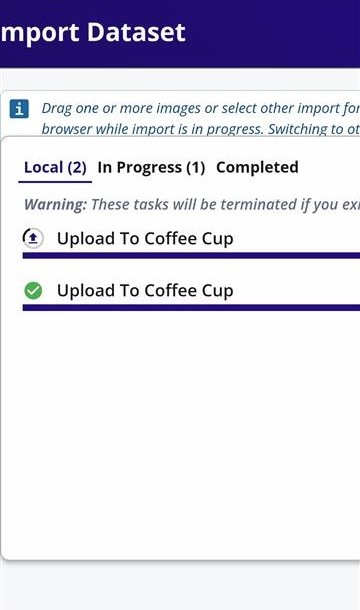
The progress for the image import will be shown.
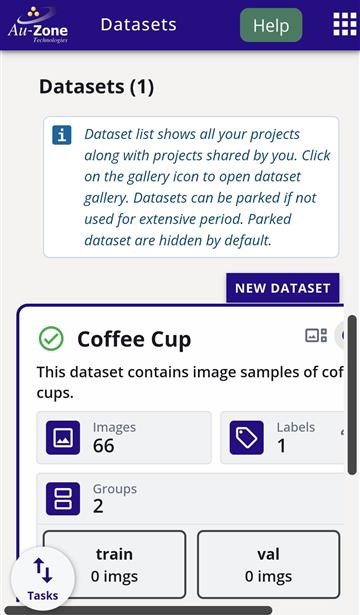
Once it completes, you should see the number of images in the dataset increase by the amount of selected images. If you do not see any changes, refresh your browser.
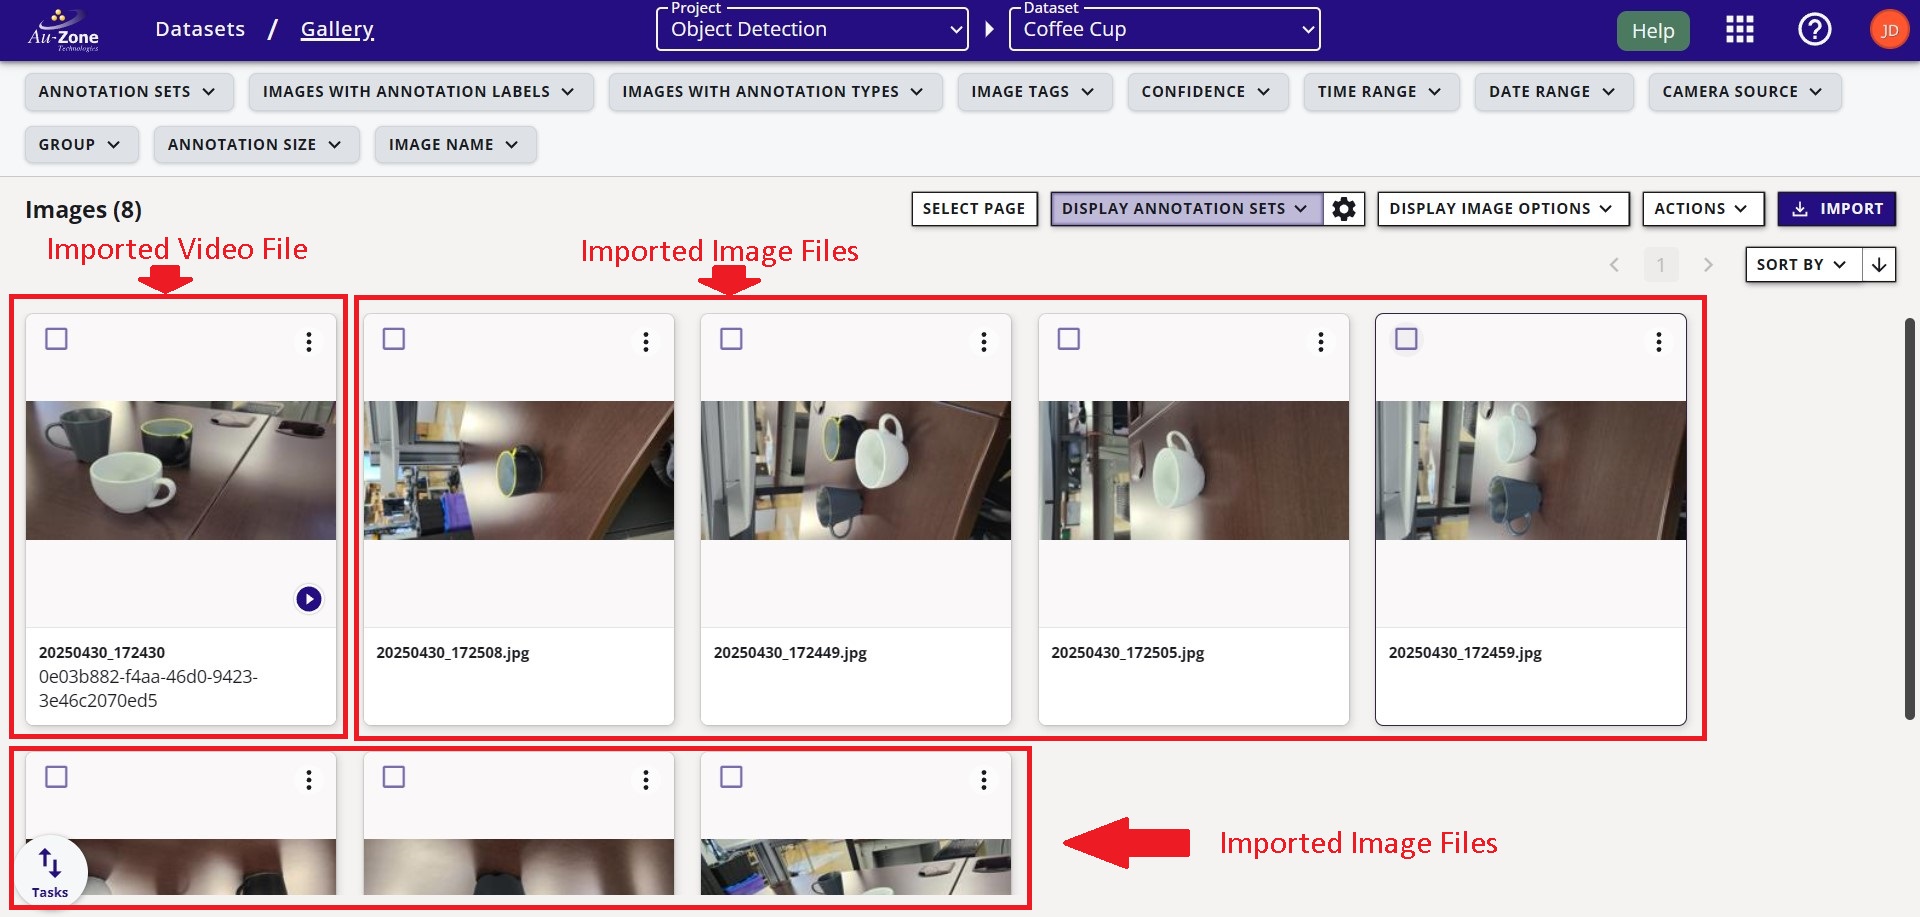
Next view the gallery of the dataset to confirm all the captured data has been uploaded. You should see the imported video file and images in the gallery. Note that videos appear as sequences with a play button overlay on the preview thumbnail.
Now that you have imported captured images or videos into EdgeFirst Studio you can now start annotating your data as shown in the next section below.
Annotate Dataset
Now that you have a dataset in your project, you can start annotating the dataset. This will briefly show the steps for annotating the dataset, but for an in depth tutorial on the annotation process, please see Dataset Annotations.
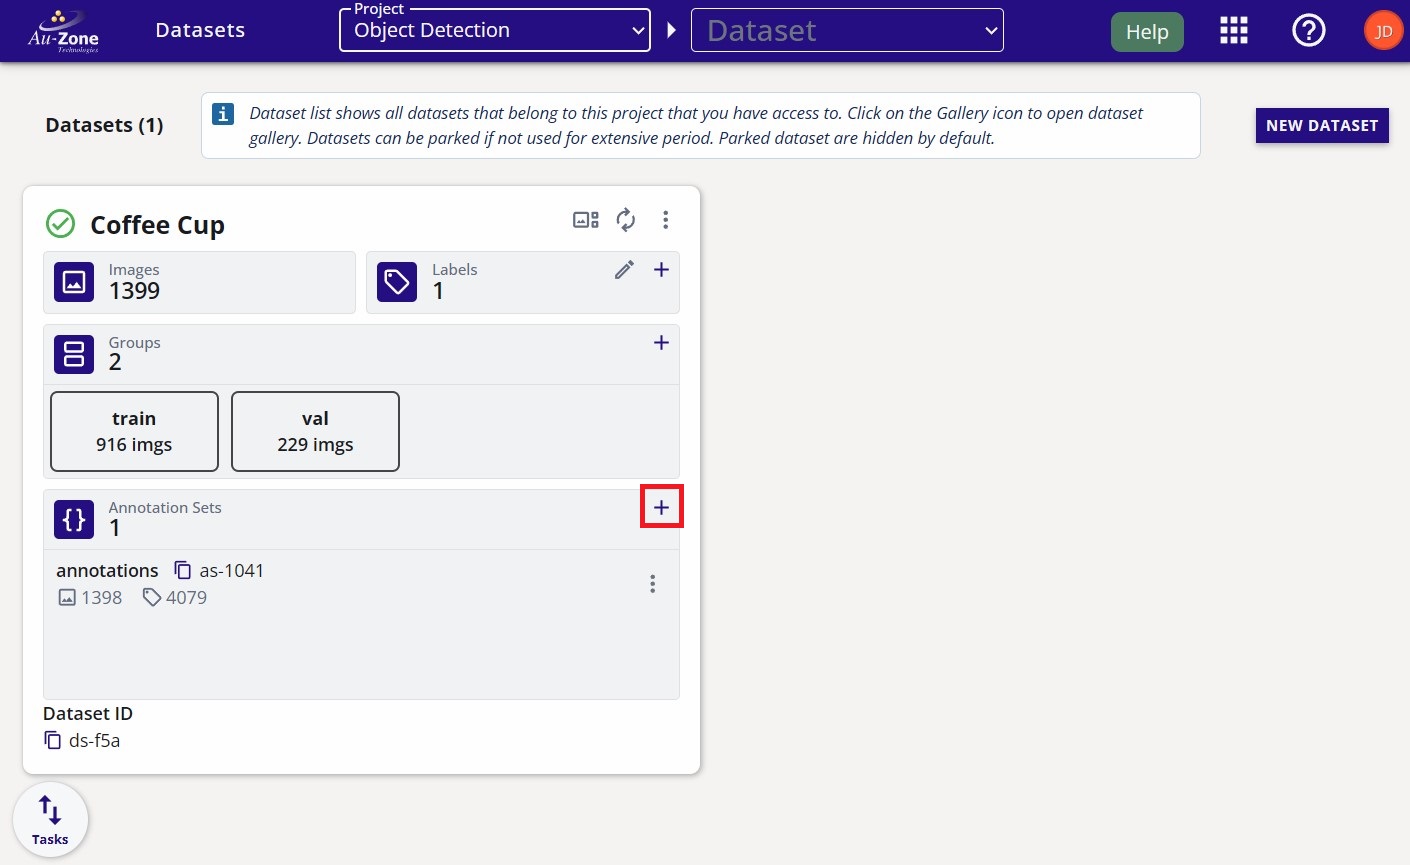
To annotate a dataset, first create an annotation set on the dataset card.
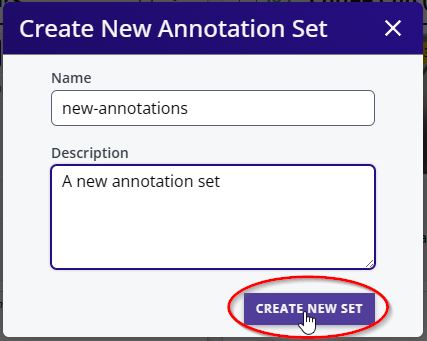
Provide the name of the new annotation set and its description
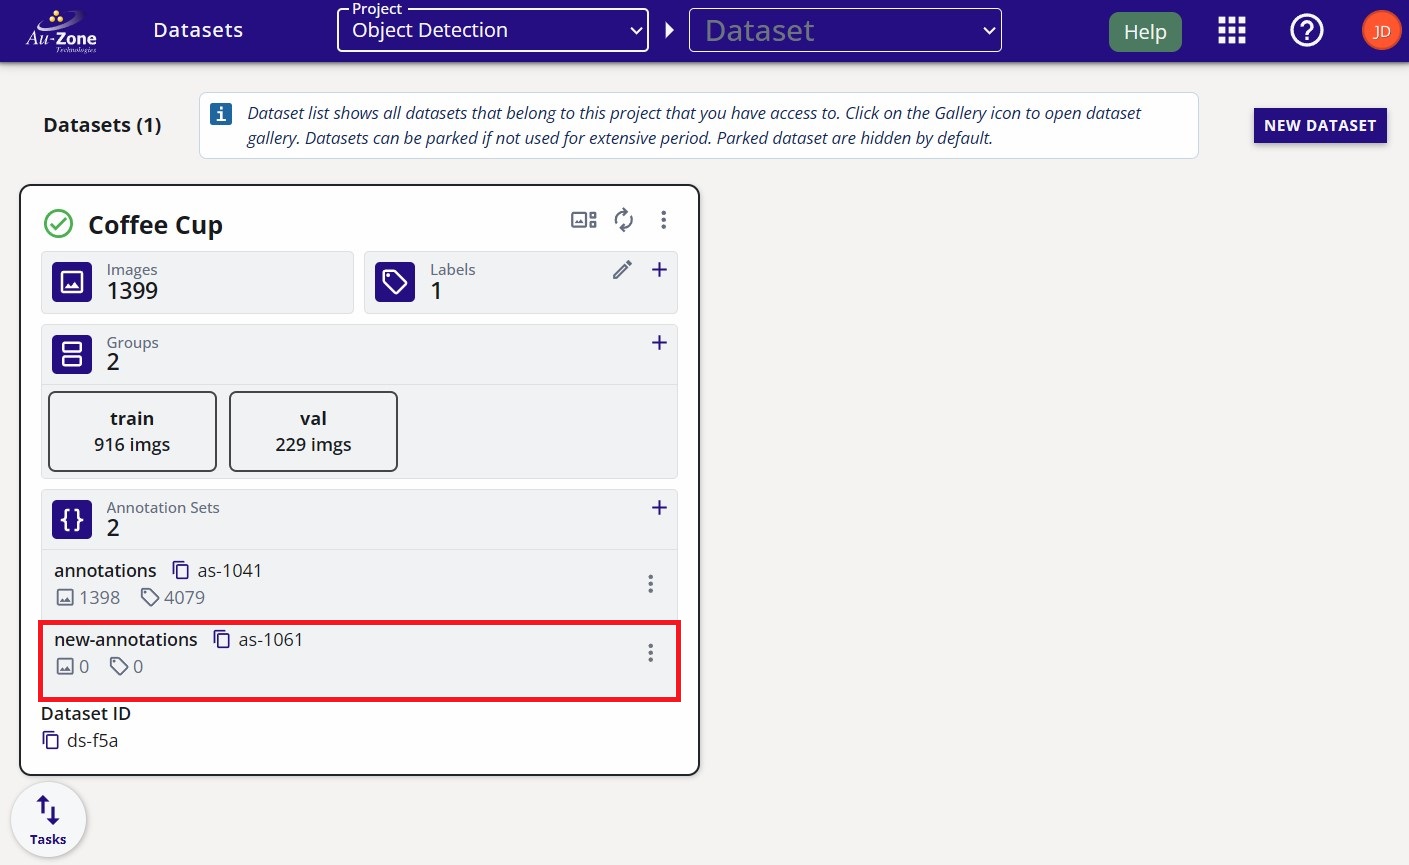
A new annotation set is now created called "new-annotations".
Next, open the dataset gallery, by clicking on the image preview of the dataset card.
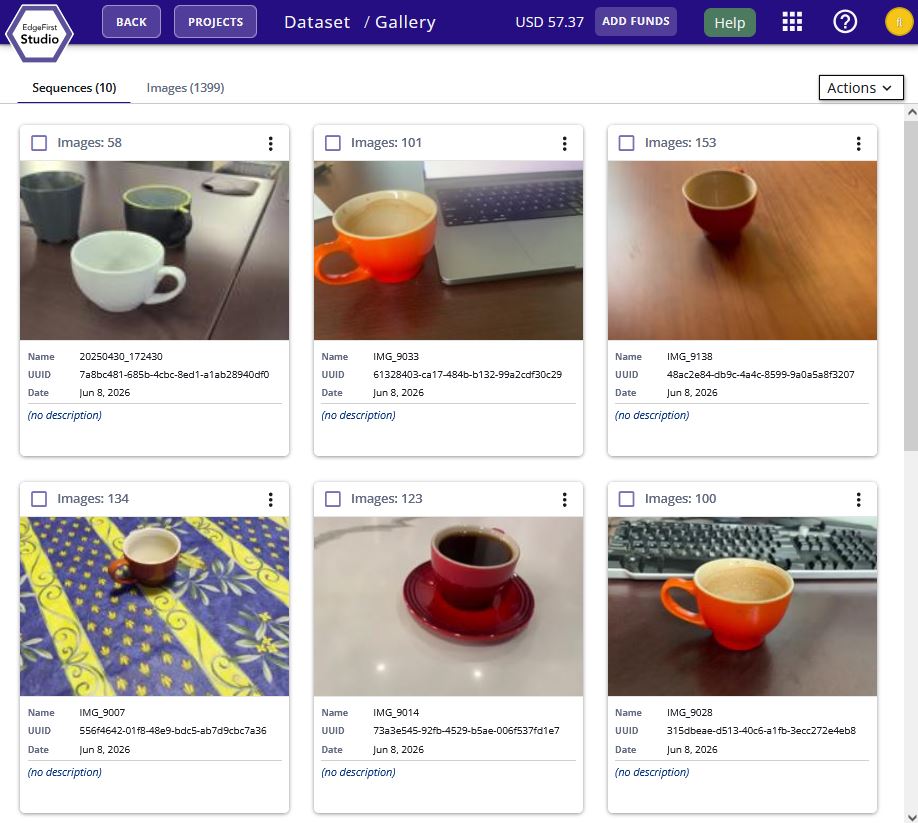
The dataset will contain sequences (video) and images. Click on any sequence card to start annotating sequences.
On the top navbar, switch to the annotation set you created.

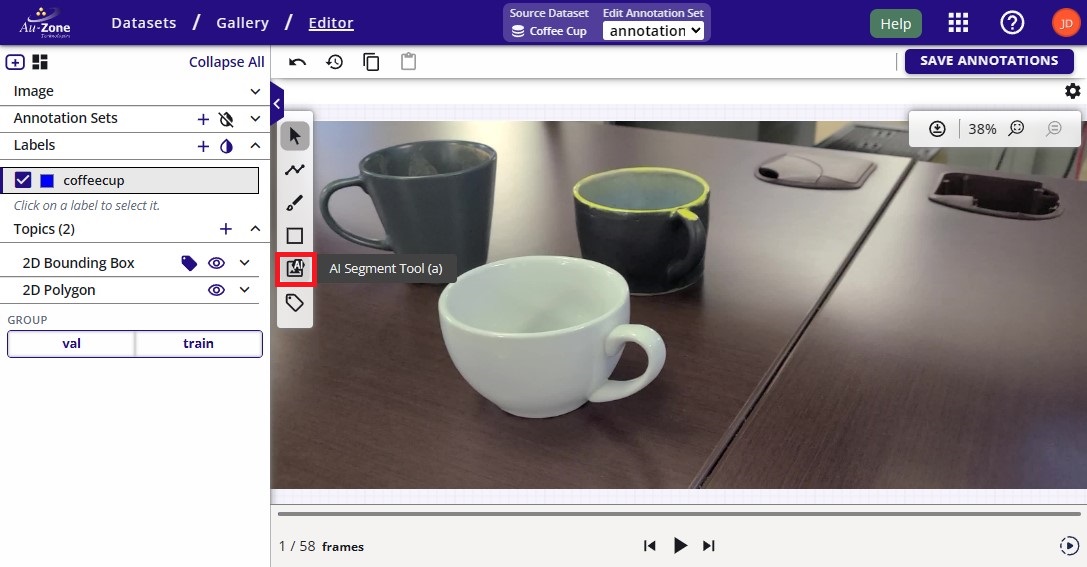
Start the AGTG server by clicking on the "AI Segment Tool" and follow the prompts as indicated.
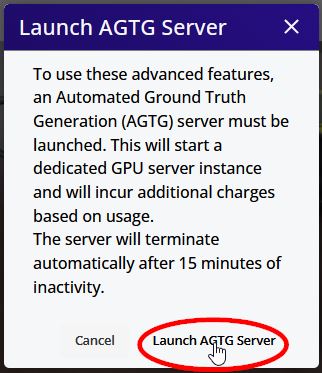
Go ahead and launch the AGTG server. Please allow ~5mins for the server to initialize.
AGTG Server Did Not Start
If the AGTG server has not started after 5 minutes, refresh your browser and click the AI Segment Tool button again.
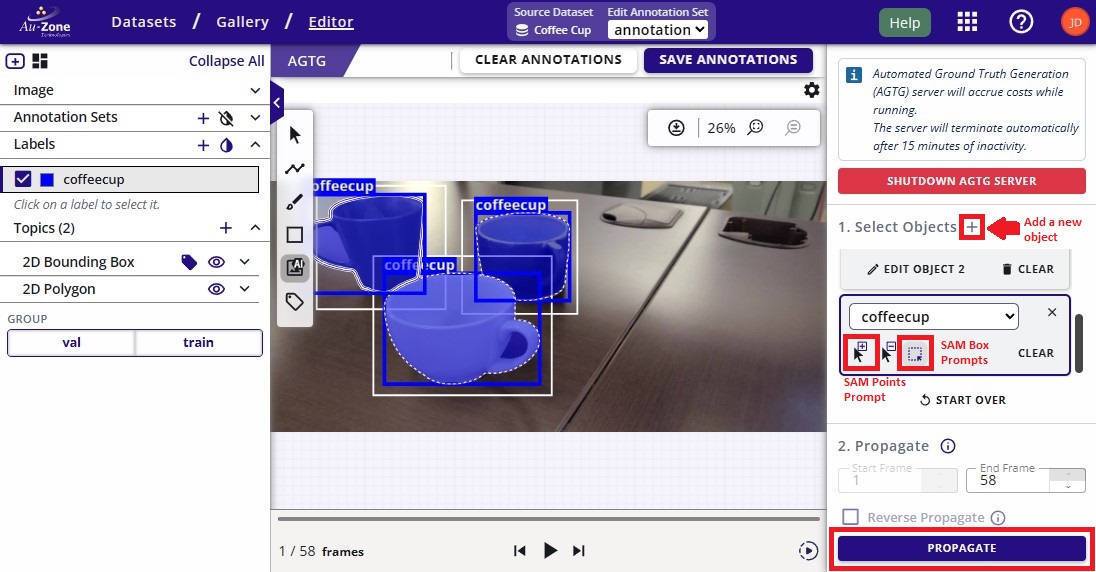
Once the AGTG server has started, go ahead and annotate the starting frame. Once the starting frame has been annotated, go ahead and propagate the annotations throughout the rest of the frames.
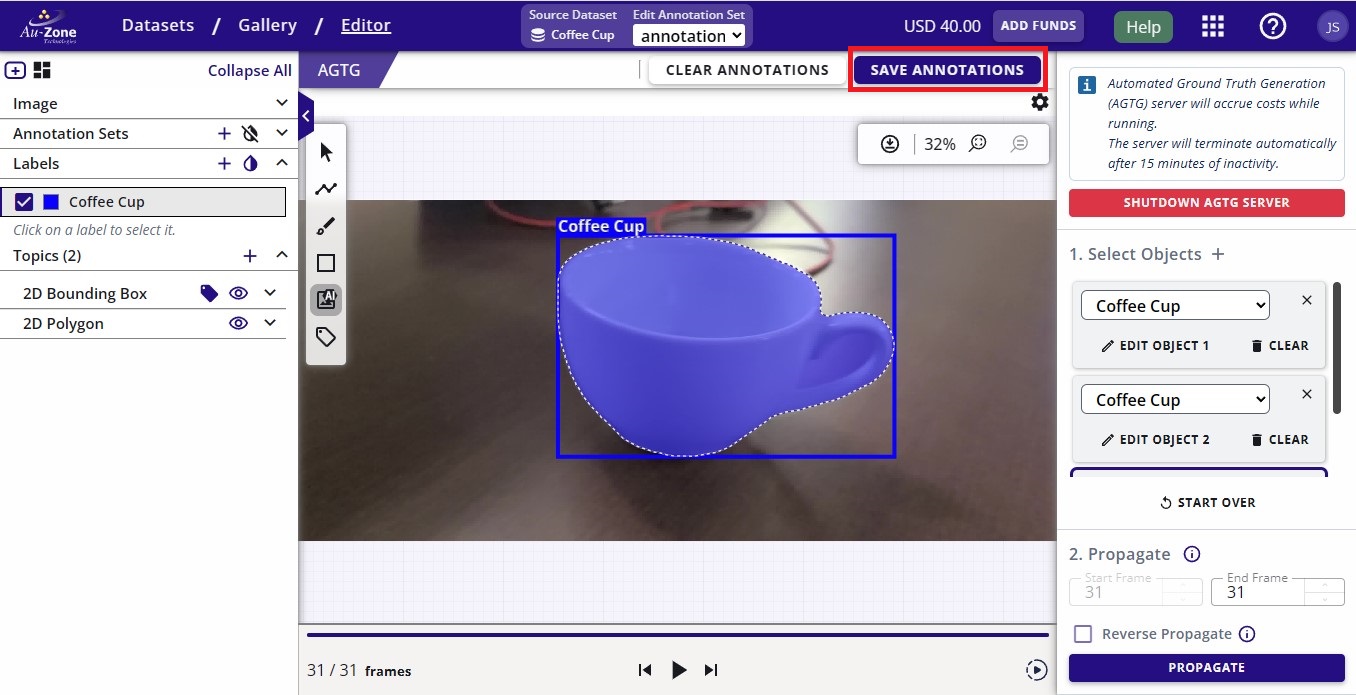
Once the propagation completes, click "Save Annotations" to save the propagated annotations.
Audit Annotations
Run the video playback to browse through the generated annotations and verify that the generated annotations are correct.
If an annotation was missed, you can quickly add the annotation using the same process and click "Save AIGT Annotations" as shown.
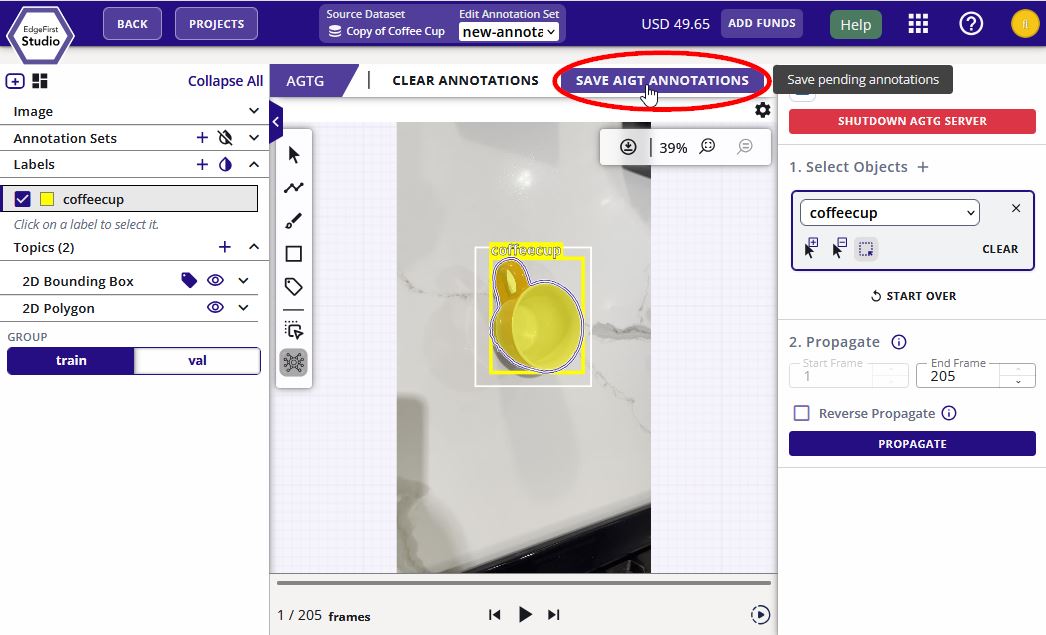
For objects that were improperly annotated, you can remove annotations. For annotations that require minor adjustments, EdgeFirst Studio has the features for adjusting annotations. Please click on the links as provided for further instructions on each of these features.
Repeat the steps for all the sequences in the dataset. You can go back to the dataset sequences by pressing the back button on the top left corner.
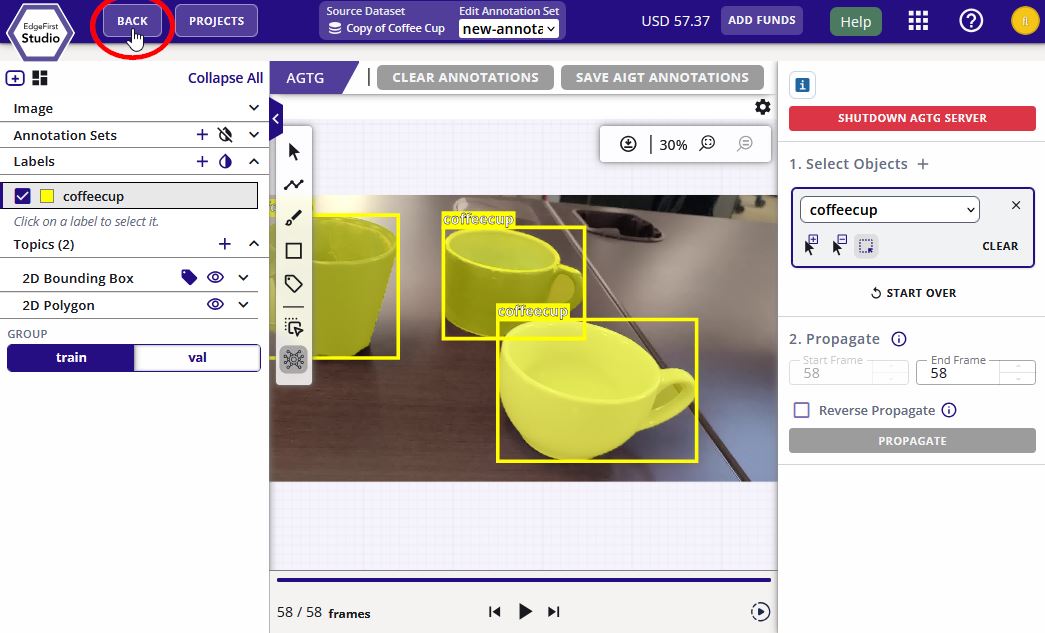
For the case of individual images, the same steps apply except there is no propagation step. You can still use the AGTG feature to quickly annotate images as shown in Add 2D annotations.
Split Dataset
Partitioning the dataset is crucial in reserving dataset portions used for training and portions used for validation to assess the performance of the model. In EdgeFirst Studio, the partitions are 80% towards training and 20% towards validation. This operation randomly shuffles the data prior to assigning them to the specified groups.
Warning
The dataset needs to be re-split whenever new sample images or frames are added to the dataset. Newly added samples are not automatically added to any group that already exists.
Consider the following dataset without any groups reserved.
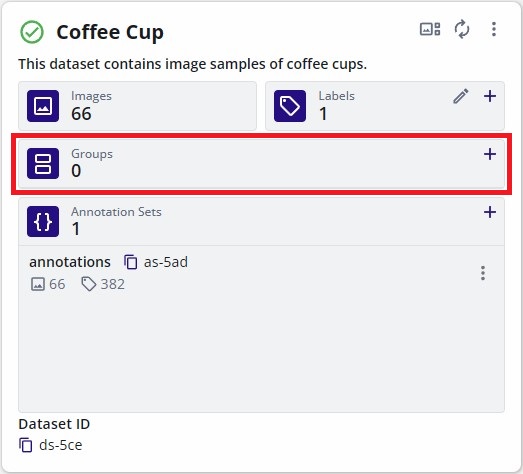
To create the dataset groups, click on the "+" button in the "Groups" field.
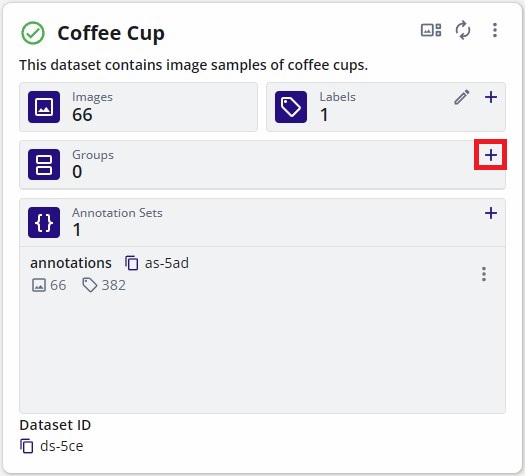
This will open a new dialog to specify the percentages of the partition belonging to the "Training" group or "Validation" group. By default 80% of the samples will be dedicated to training and 20% remaining will be dedicated towards the validation samples.
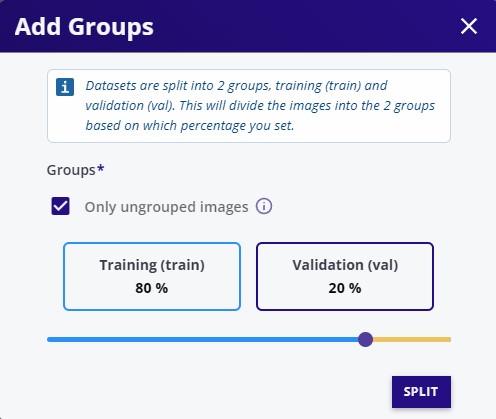
Once the groups are specified, click "Split" to create the groups. This will automatically divide the samples in the dataset based on the percentages of each group specified.
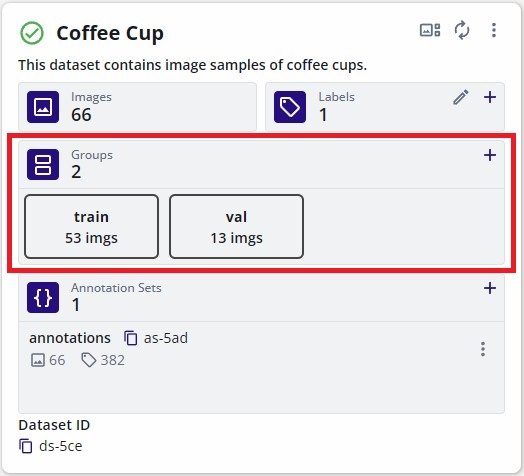
Before a dataset can be used for training, it must be tagged. To preserve its current state, assign a version tag to the dataset.
Click on the dataset options at the top right of the dataset card (three vertical dots). Then click the "History" button.
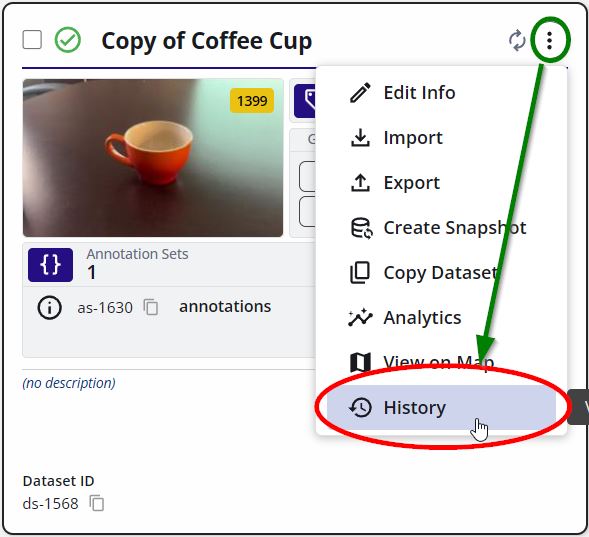
Add a new tagged version of the dataset by clicking the + green button on the right of the page as shown.
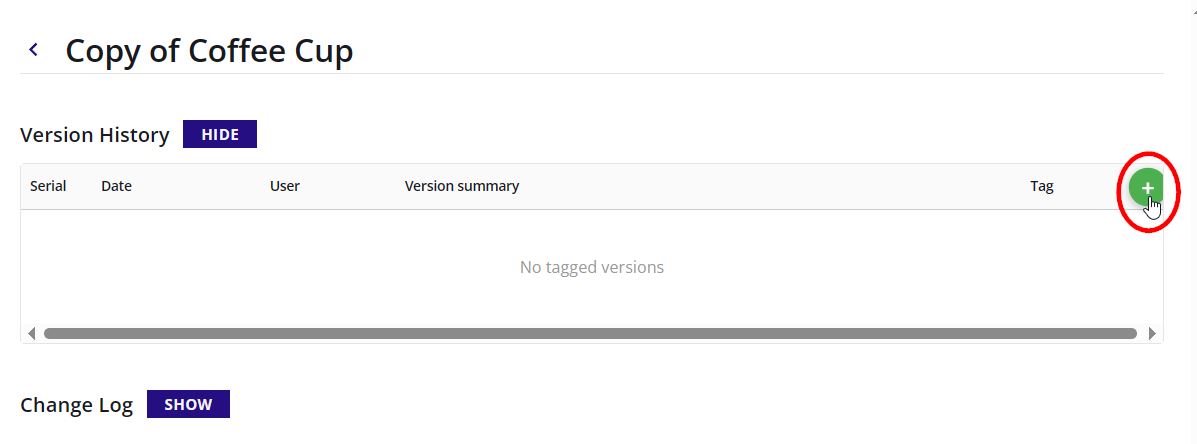
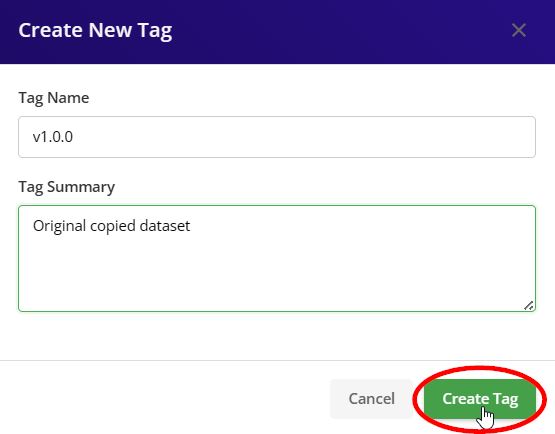
Specify the tag version and tag description. Click "Create Tag" to tag the dataset.
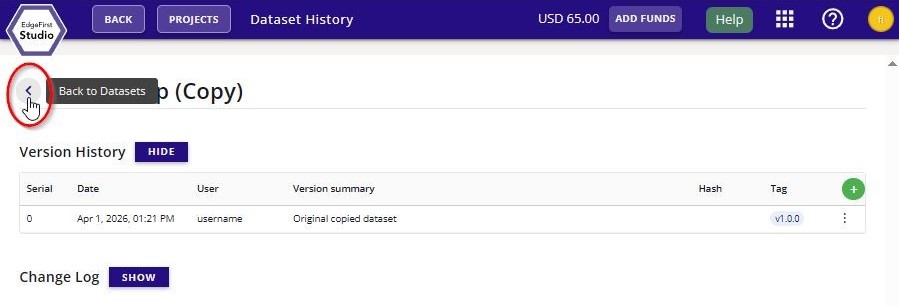
The new dataset tag will appear under "Version History" of this page. You can go back to the dataset card by clicking the "Back to Datasets" button.
Train Vision Model
Now that your dataset is fully annotated, versioned, and split into training and validation partitions, you are ready to begin training your model. This will briefly show the steps for training a model, but for an in depth tutorial, please see Training Vision Models.
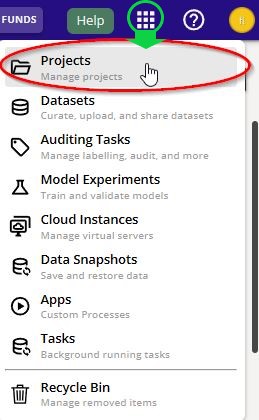
Navigate back to the "Projects" page. You can go back to the "Projects" page by clicking the Apps Menu waffle button on the top right of the Navigation bar. Click the first selection to take you to the "Projects page".
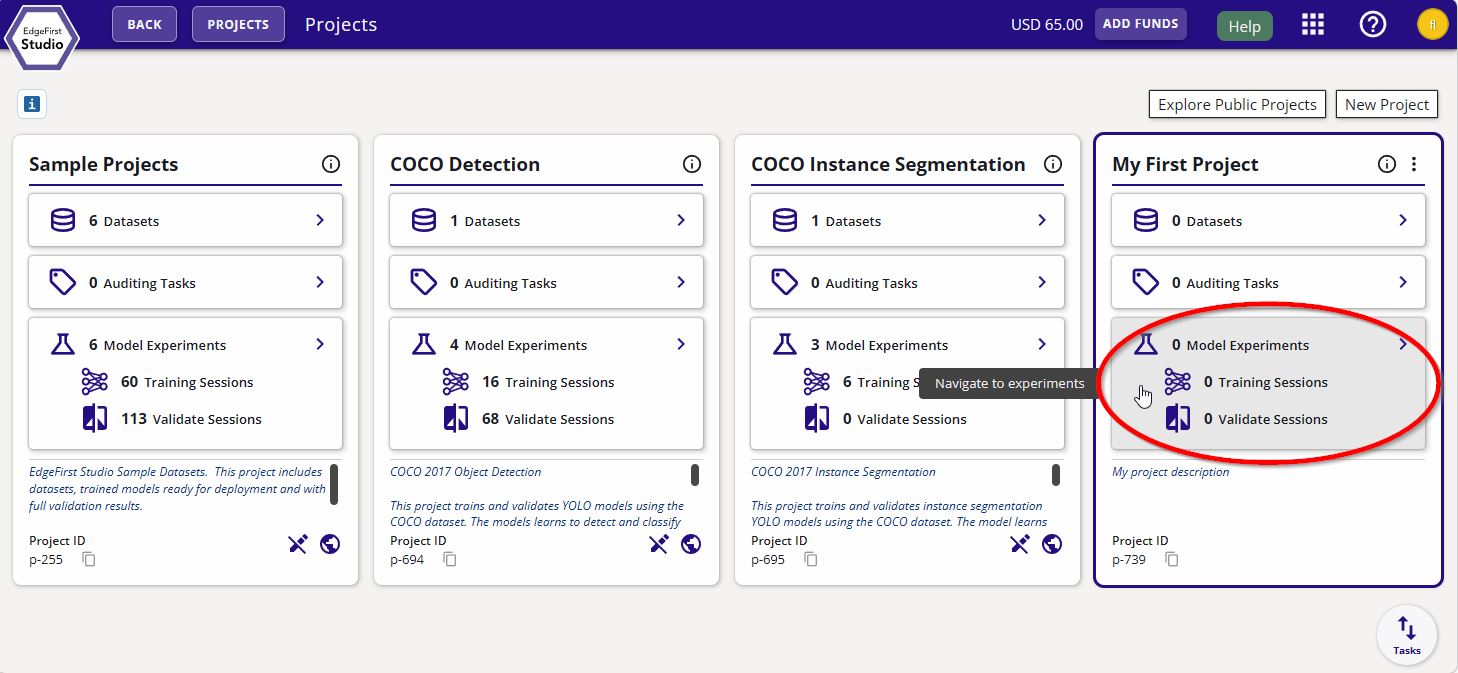
From the "Projects" page, click on "Model Experiments" of your project.
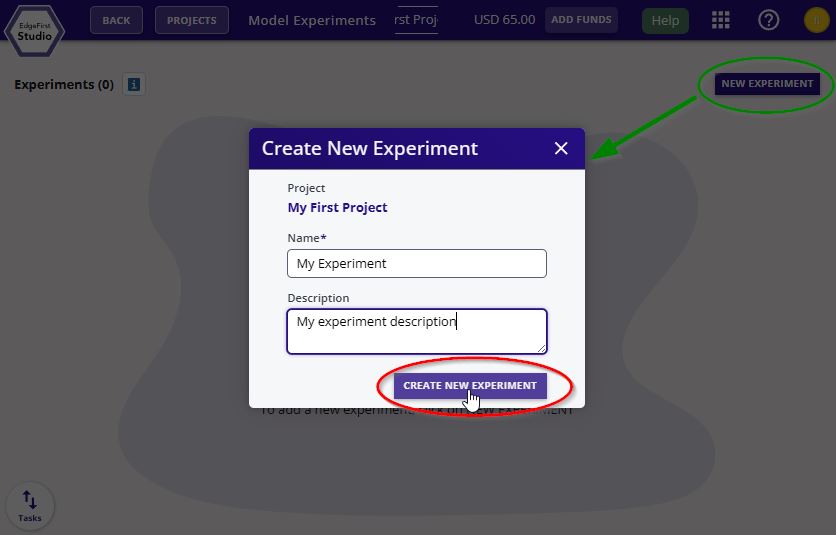
Create a new experiment by clicking "New Experiment" on the top right corner. Enter the name and the description of this experiment. Click "Create New Experiment".
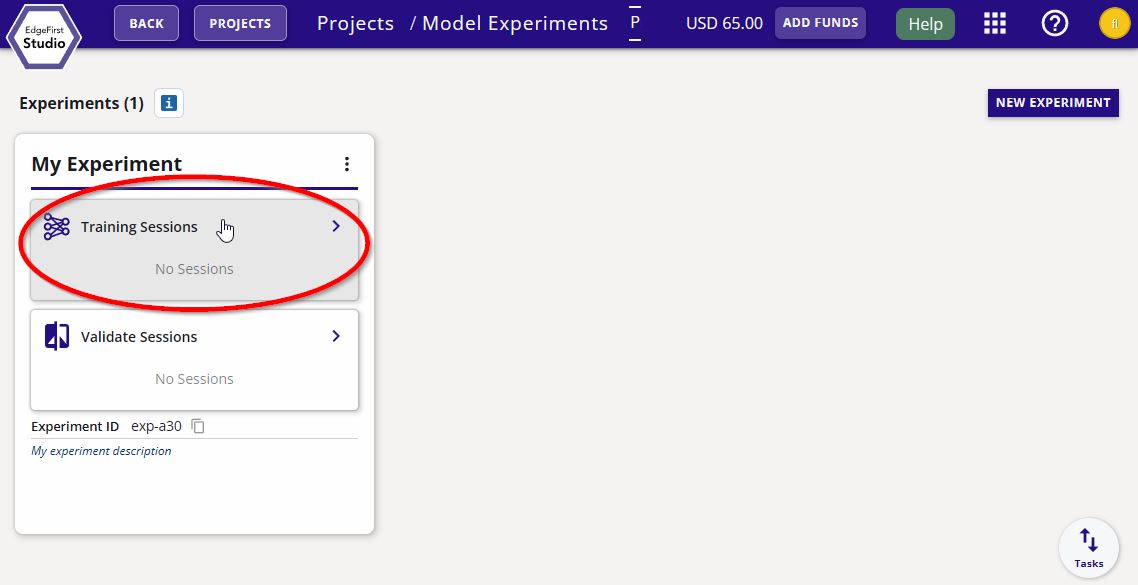
Navigate to the "Training Sessions".
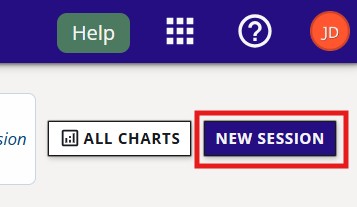
Create a new training session by clicking the "Actions" dropdown menu on the top right of the page and then click the "+ New" button.
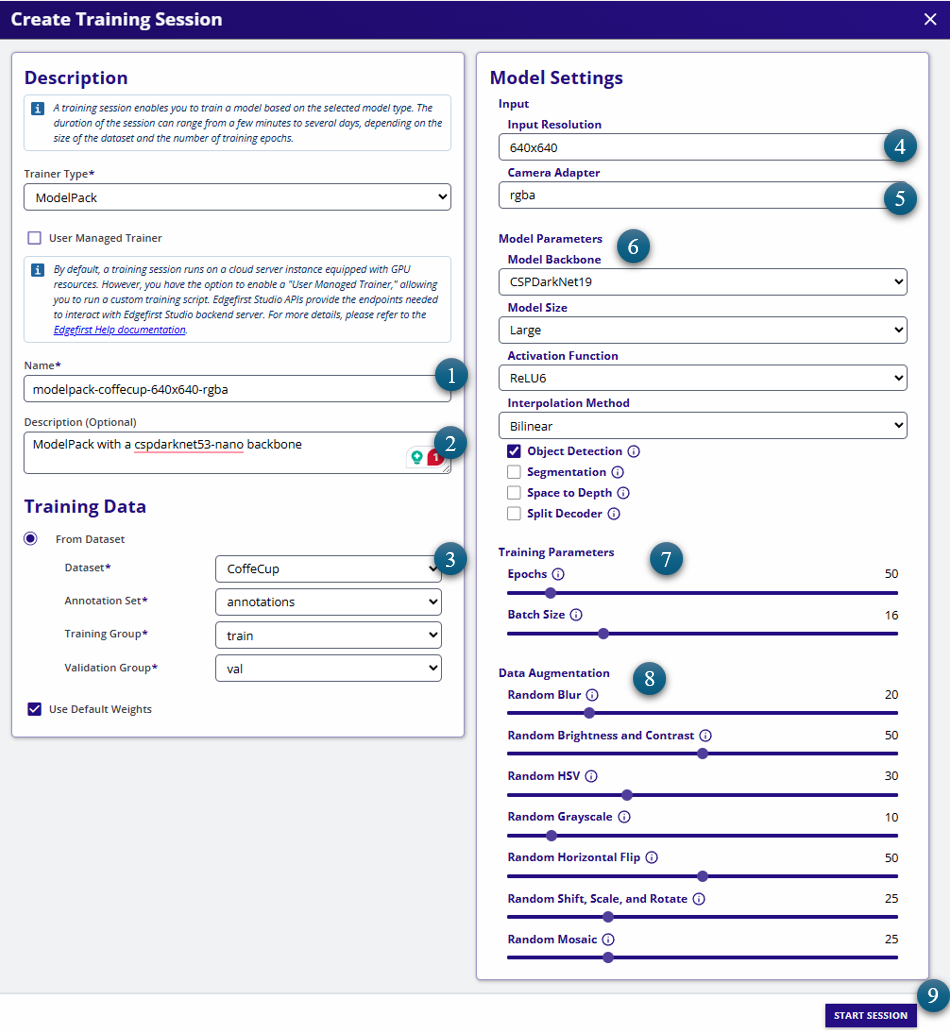
Follow the settings indicated and keep the rest of the settings default. Click "Start Session" to start the training session.
InsufficientInstanceCapacity

If you see this error after starting your training session, retry creating the session. This can happen when AWS reports that no EC2 instances are currently available to launch; the current workaround is to retry.
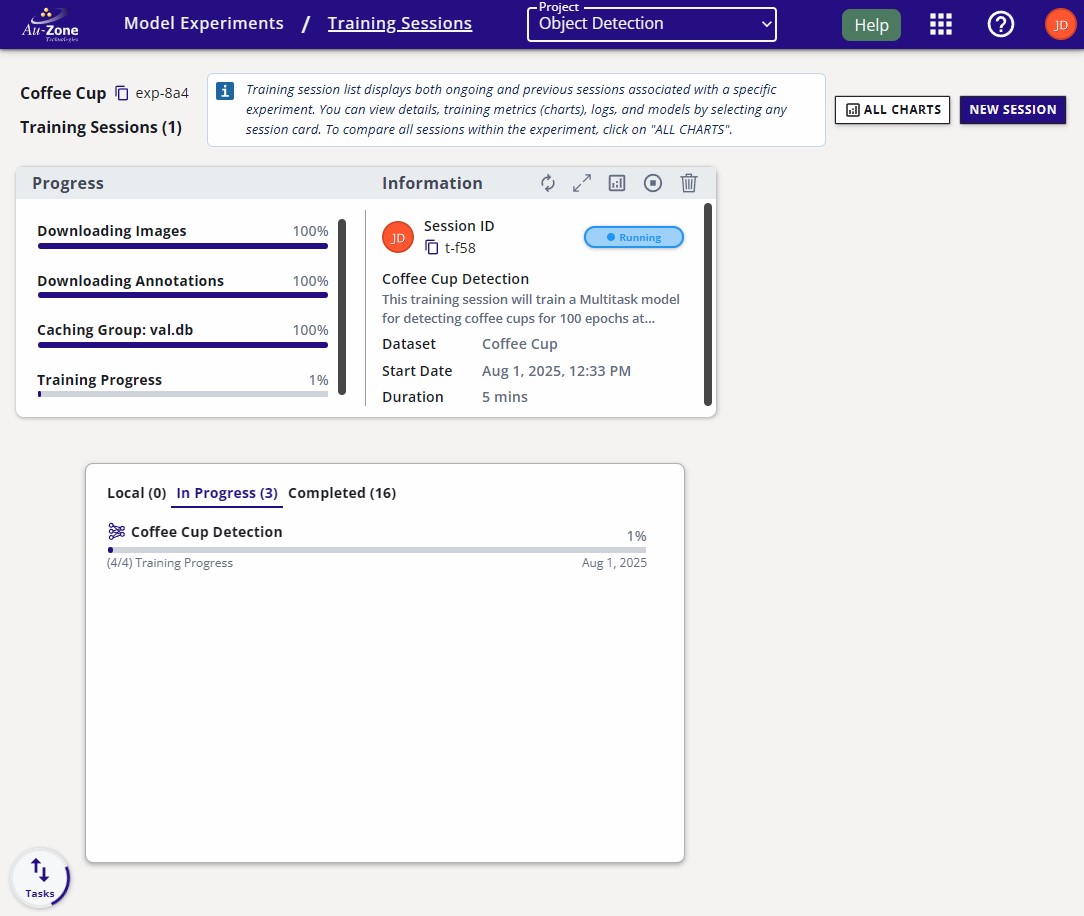
The session progress will be shown like the following below.
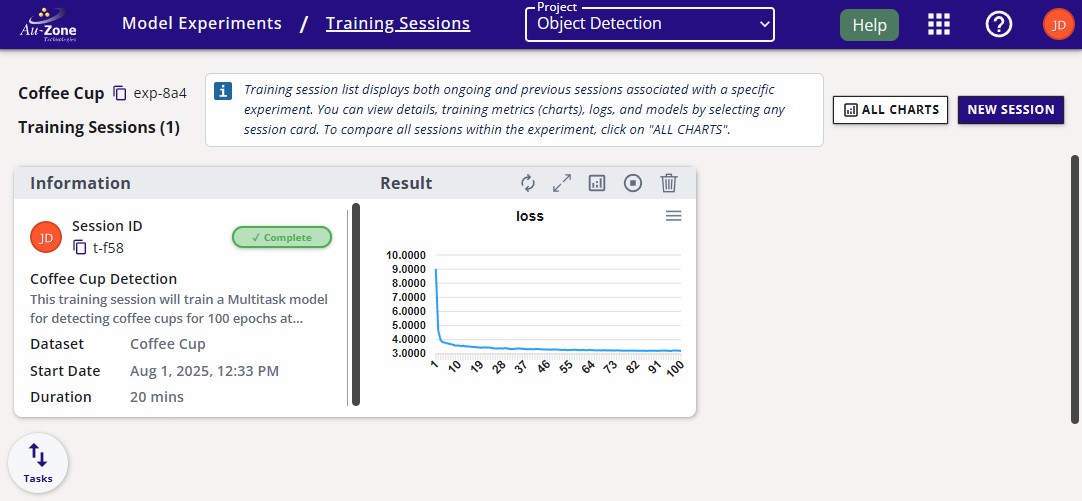
Once the session is complete, the session card will appear like the following.
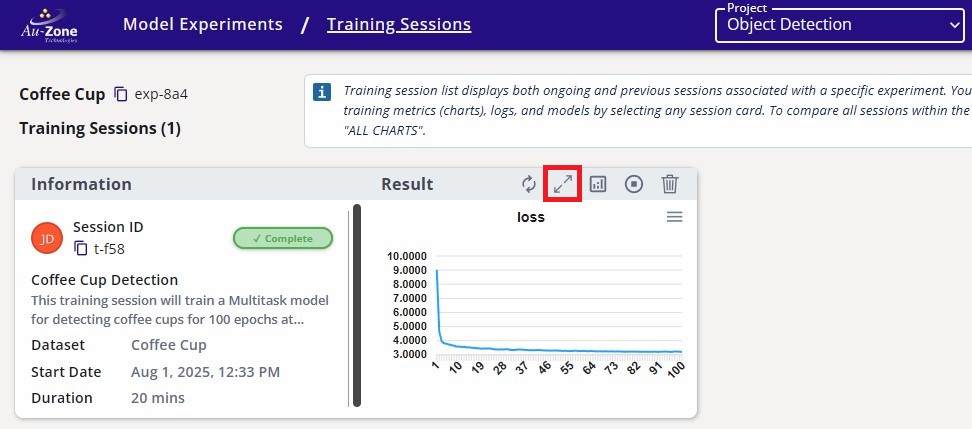
Click the training session card for more information.
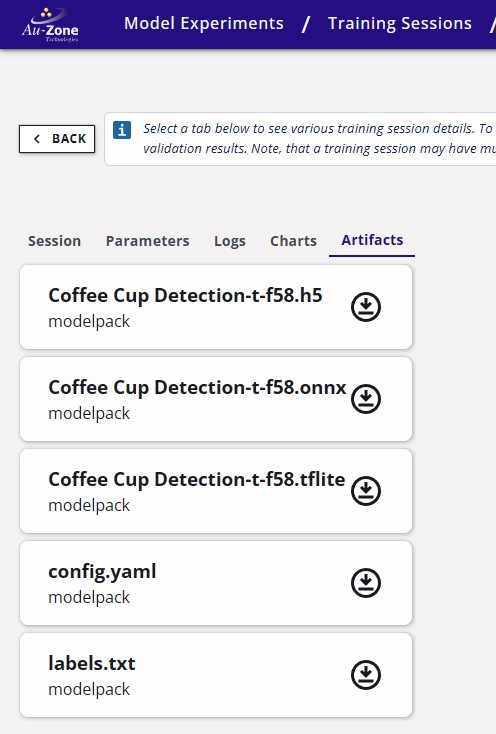
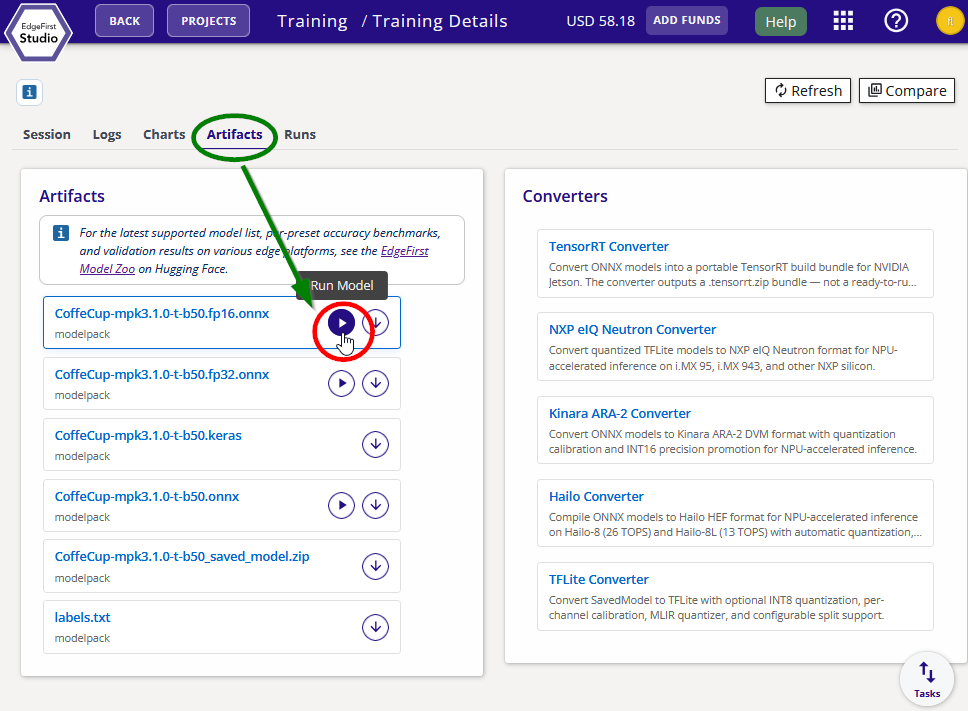
The trained models will be listed under the "Artifacts" tab. The download button next to these artifacts will download the artifacts to your machine.
Validate Vision Model
Now that you have trained a model, you can validate its performance. The purpose of validation is to determine whether the selected model meets the performance requirements before deployment. EdgeFirst Studio offers two validation paths depending on your goal:
| Path | Where it runs | Supported formats |
|---|---|---|
| Cloud Validation (this guide) | EdgeFirst Studio EC2 | ONNX, Keras, TFLite |
| On-Target Profiling | Your edge platform | All converted formats (.tflite, .hef, .dvm, .engine) |
Validating on target hardware?
Cloud validation only supports ONNX, Keras, and TFLite artifacts. If you want to measure real inference latency and accuracy on your target device — including NPU-compiled formats like Neutron, Hailo, Ara2, or TensorRT — use the EdgeFirst Profiler.
Cloud Validation
If you haven't already, click on the training session card for more information.
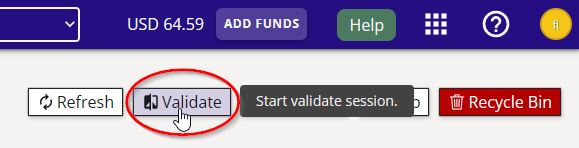
On the top right corner of the page, click on the "validate" button as indicated.
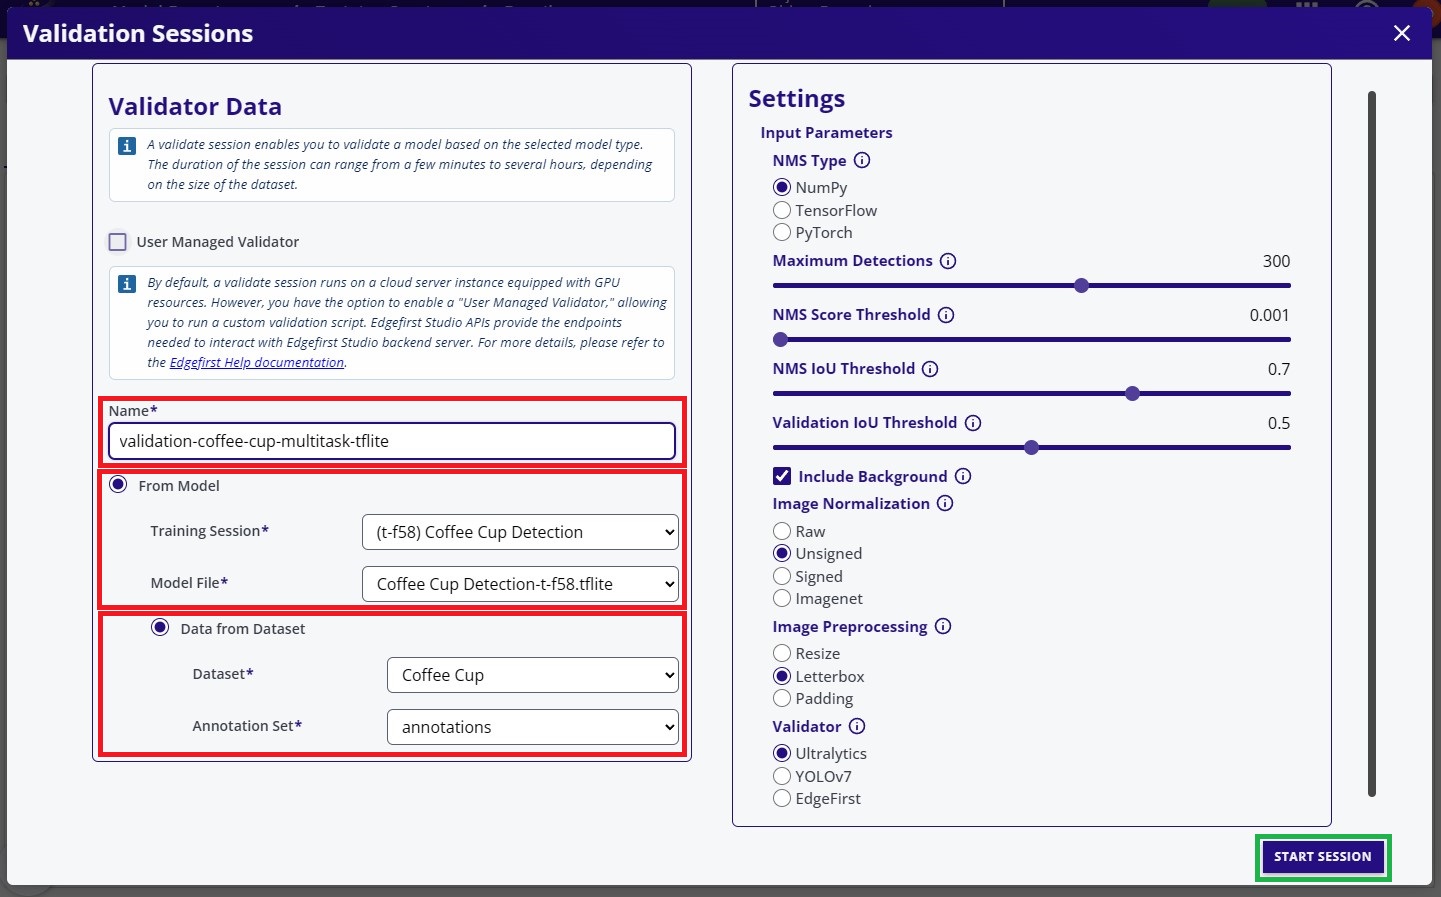
Enter a name for the validation session, then select the model and dataset to use for validation.
Under Model Selection, choose an ONNX, Keras, or TFLite artifact — these are the formats supported by cloud validation.
For this example, all remaining settings were left at their default values. When you are ready, click Start Session at the bottom of the page to begin the validation process.
InsufficientInstanceCapacity
If you see this error after starting your validation session, retry creating the session. This can happen when AWS reports that no EC2 instances are currently available to launch; the current workaround is to retry.
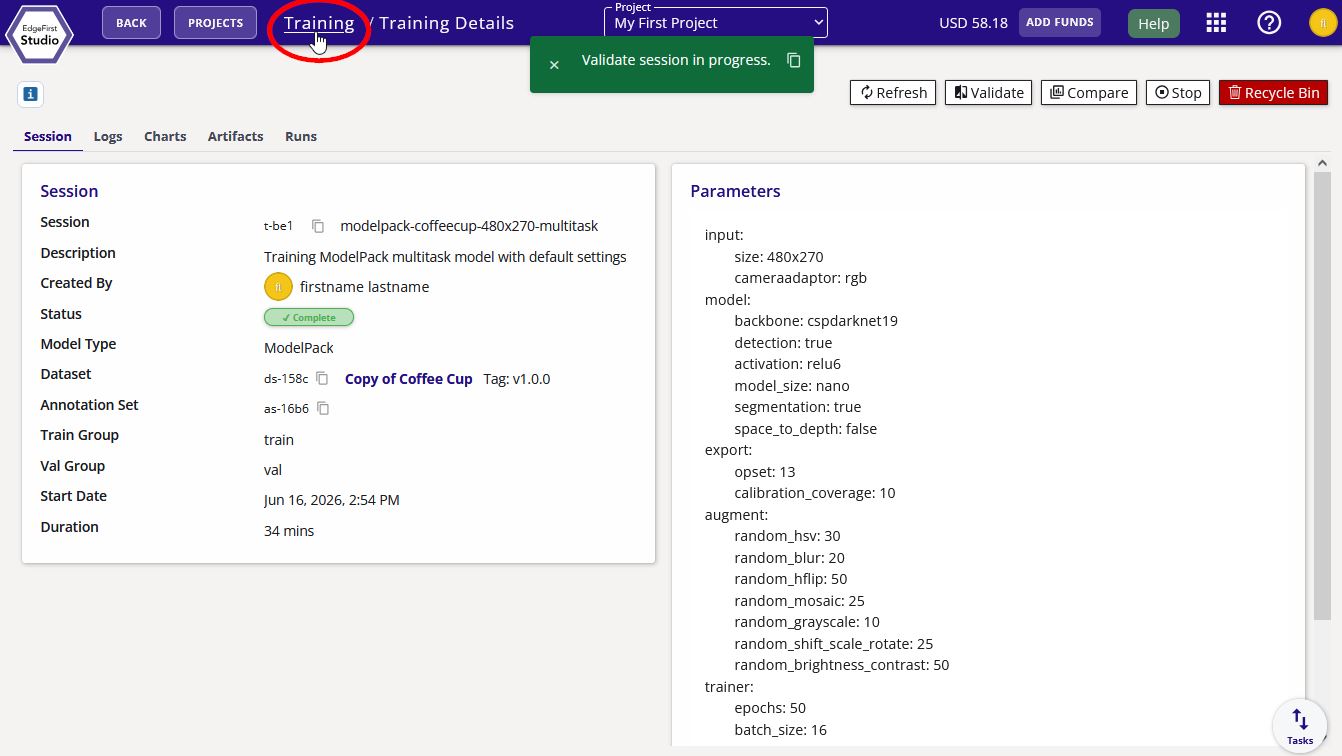
Go to the created validation session by first going back to the "Model Experiments" page.
Next, click the validation sessions of the model experiments.
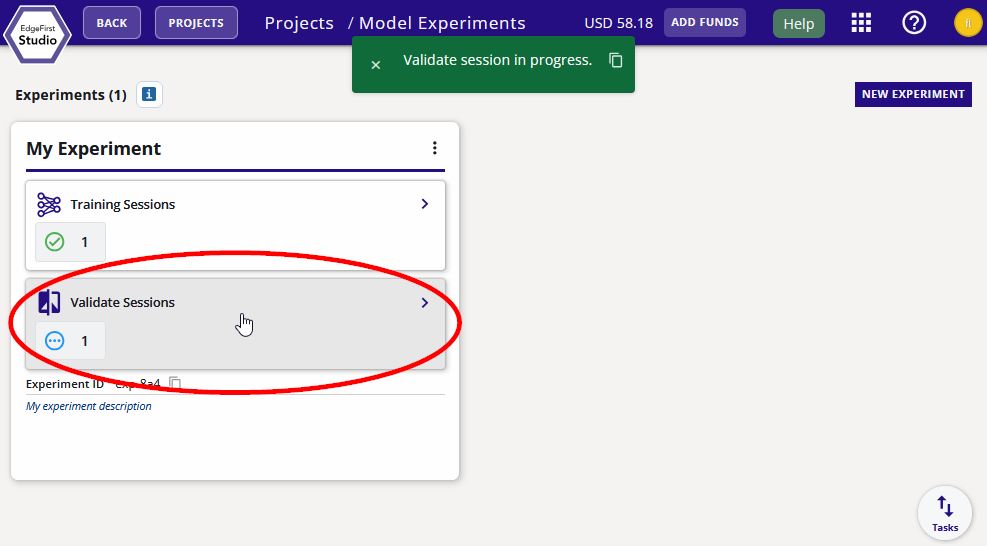
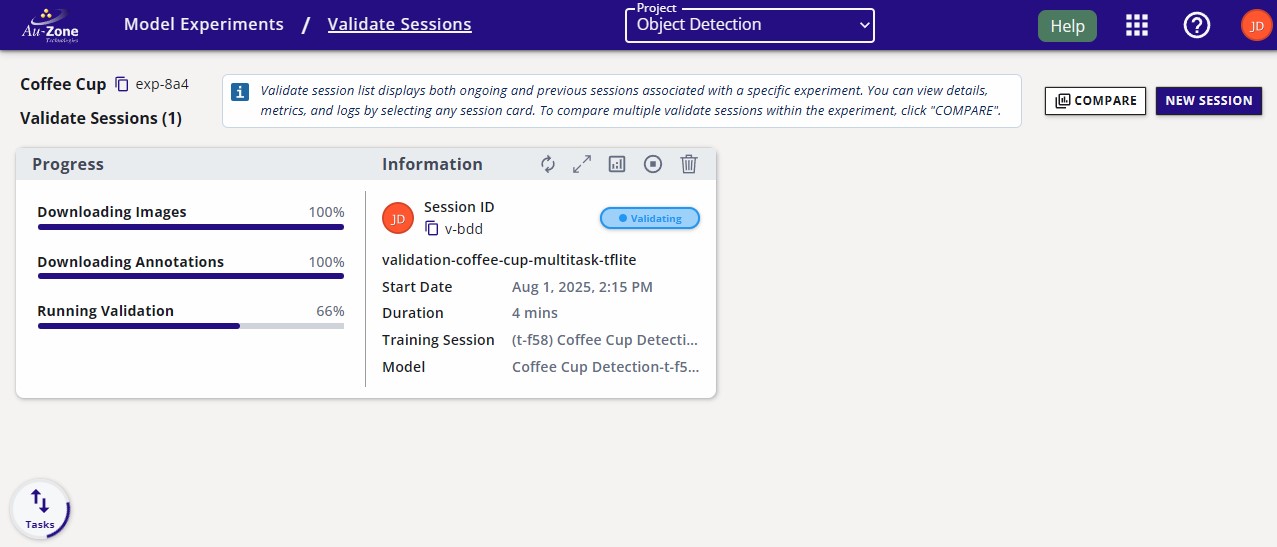
The validation session progress will appear in the "Validation" page as shown below.
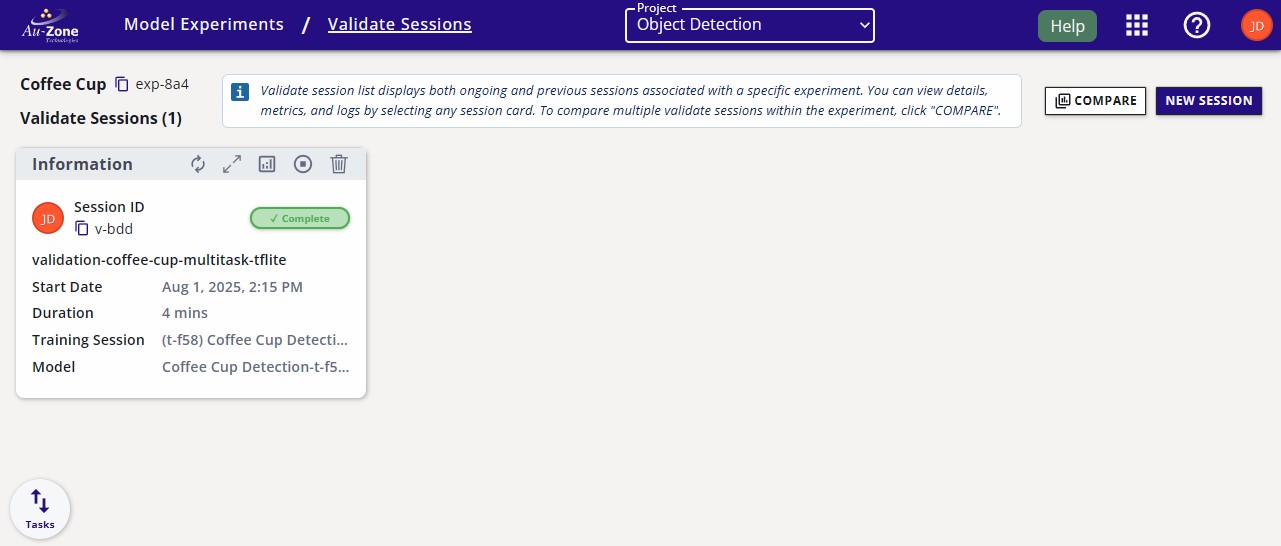
Once the session is complete, the session card will appear like the following. To view the validation metrics, click the validation charts button as indicated.
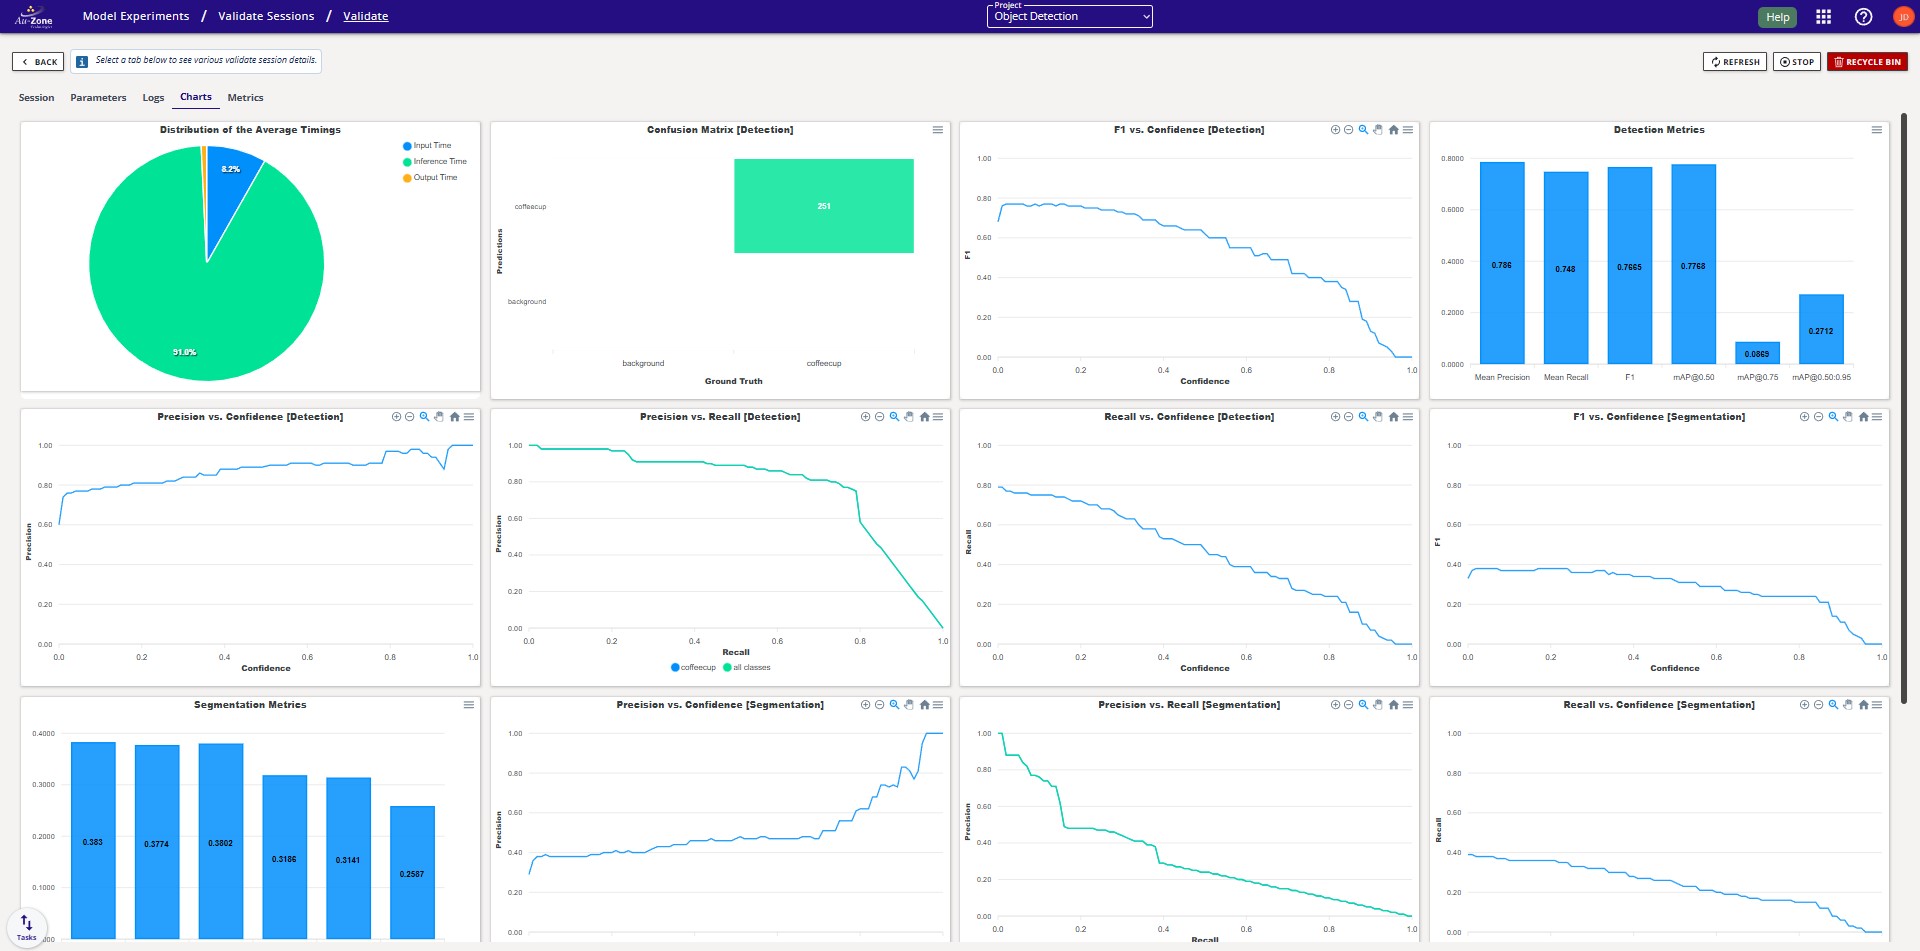
The validation metrics should appear like the following. For more information, please see the Validation Metrics section.
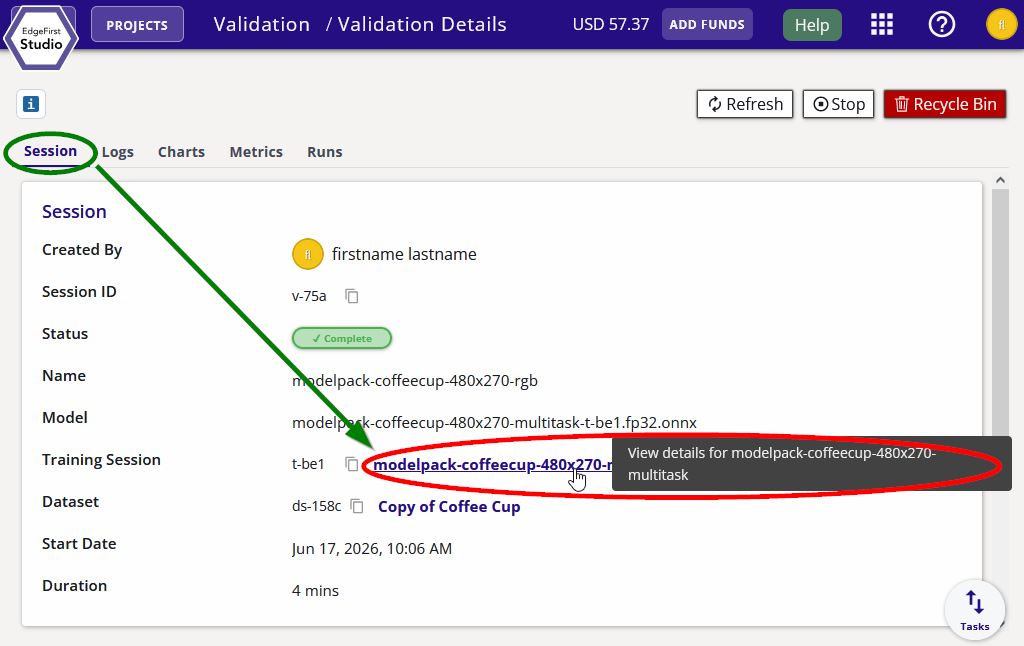
You can navigate back to the training session by clicking on the "Training Session" link under the "Session" tab.
Deploy the Model
Once you have validated your trained model, you can deploy the model in the browser using EdgeFirst Studio. You can follow these steps either on a PC or a mobile device connected to EdgeFirst Studio in a browser. Please note that the browser will use the camera on your device to run model inference.
ONNX models only
Live browser-based model running only supports ONNX format. To validate or profile models in other formats (TFLite, Neutron, Hailo, TensorRT, etc.) on real hardware, use the EdgeFirst Profiler.
From the training session card, you can run the model for inference by clicking the "Run Model" button on the top right of the page.
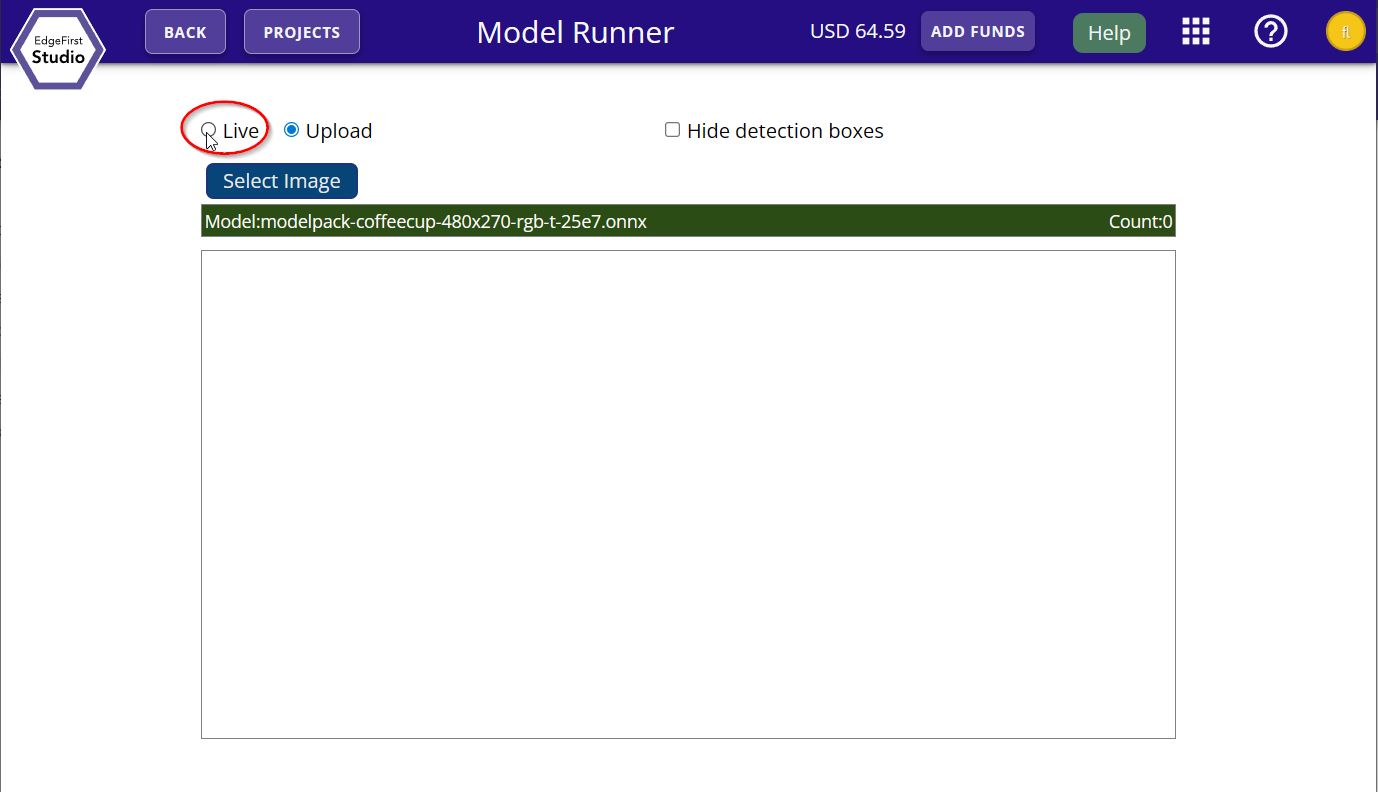
You will be given the option for either live inference or inference from a file upload. Go ahead and demo the live inference feed by clicking the "Live" option.
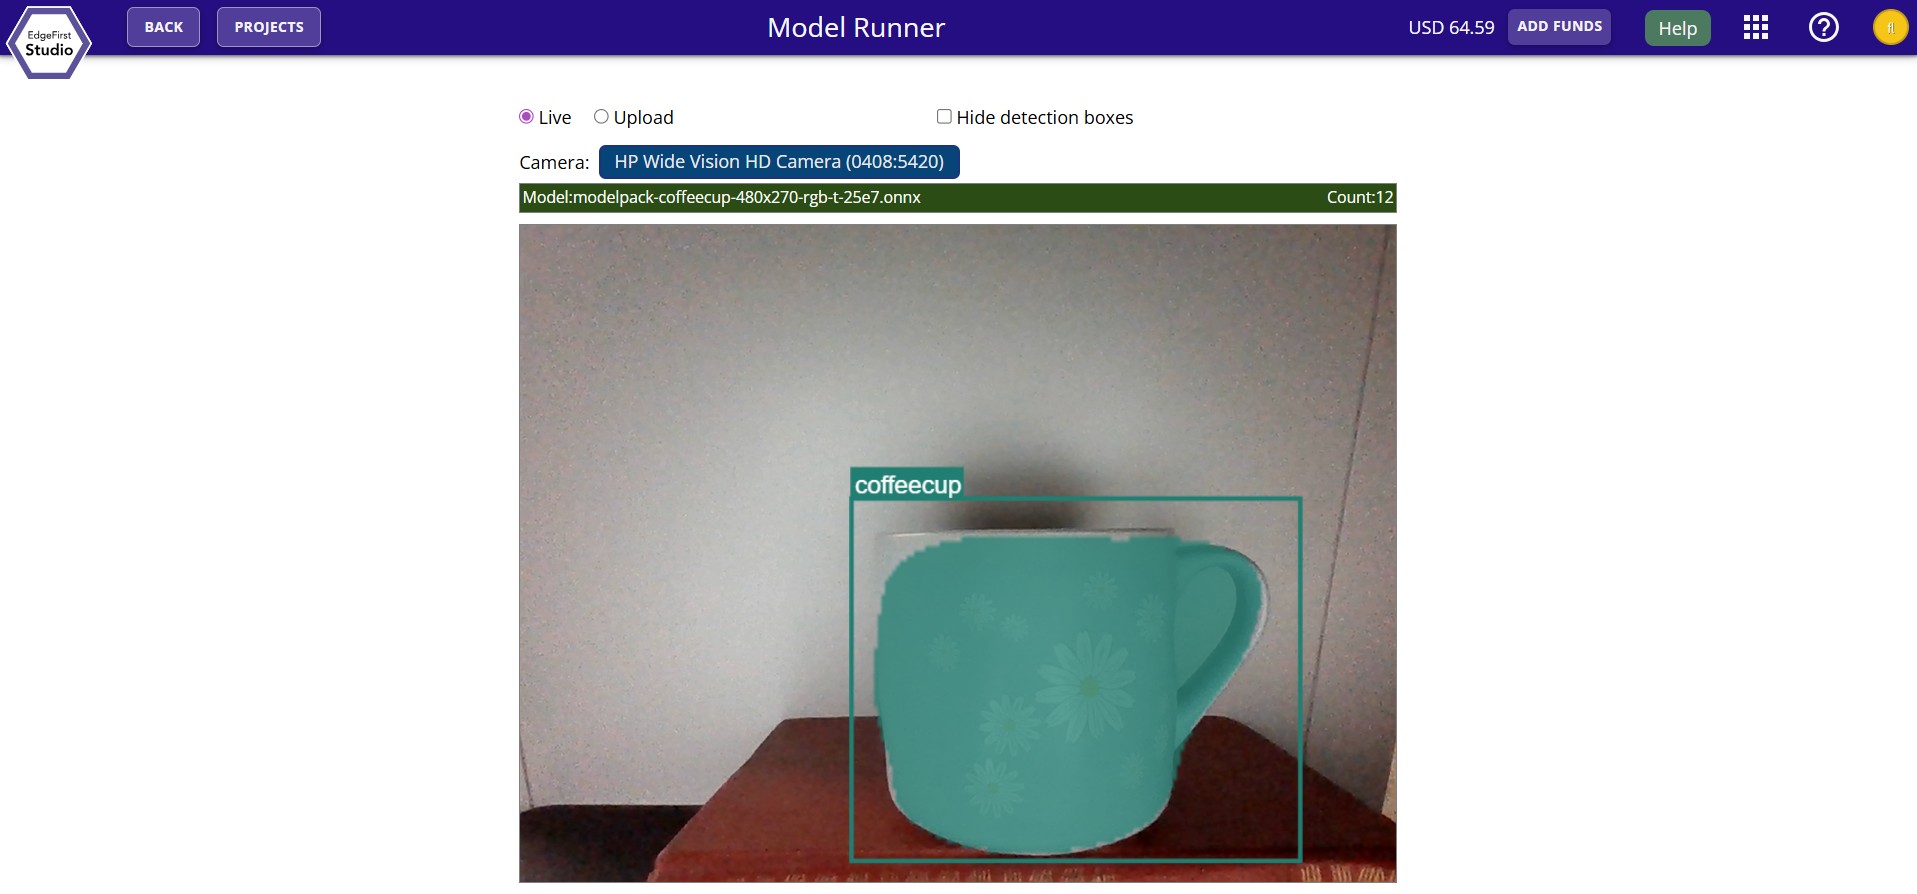
You should now see the live inference feed on your browser running the trained model.
You can also find more examples of deploying the model across different platforms. Here is a checklist of supported devices. We support validation on specific targets and live video inference with links provided below.
| Platform | On Target Validation | Live Video | In Development |
|---|---|---|---|
| EdgeFirst Studio | ✅ | ✅ | |
| PC / Linux | ✅ | ✅ | |
| Mac/MacOS | ✅ | ✅ | |
| Maivin | ✅ | ✅ | ✅ |
| Raivin Fusion | ✅ | ✅ (on target validation) | |
| i.MX 8M Plus EVK | ✅ | ✅ (native runner) | |
| i.MX 95 EVK | ✅ | ✅ (native runner) | |
| NVIDIA Jetson Orin | ✅ | ✅ (native runner) | |
| Raspberry Pi | ✅ | ✅ (native runner) |
Additional Platforms
Certain platforms are still under development and support for platforms beyond these listed will be available soon. Let us know which platform you'd like to see supported next!
Next Steps
Have a target device? Check out the Hardware Persona Workflows to run through the MLOps process on your device.