Model Experiments Dashboard
A model experiment is a container of training and validation sessions in the experiment. The following figure shown is the "Model Experiments" page. This page will contain all the experiments that were started by the user.

The following figure breaks down the elements of an "Experiment" card.

An experiment will contain child training and validation sessions. The training sessions and validation sessions will be described in more detail in the sections below.
Training Sessions
Training sessions take in datasets and synthesize from them new AI models for object recognition (Vision) or object perception (Fusion).
From the "Model Experiments" page, we can click on the "Training Sessions" button with the icon  to see the training sessions in the experiment. The figure below shows the layout of the training session cards under the "Training Sessions" page.

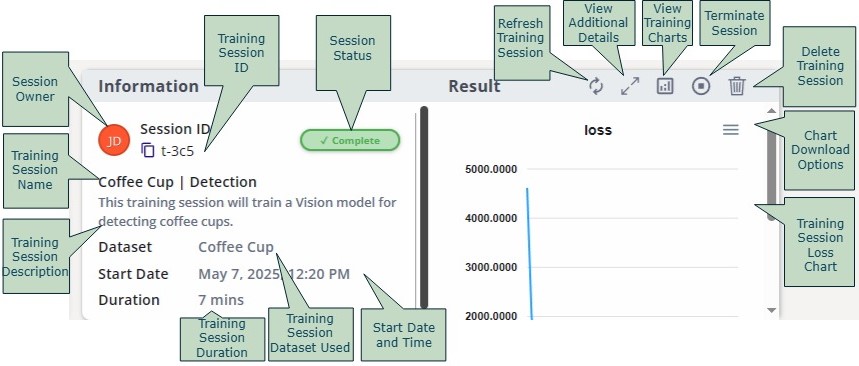
The following figure describes the attributes of any given training session.
To compare all the training charts of each session, click on "All Charts" at the top right corner of the "Training Sessions" page. This will show the charts from each session overlaid on top of one another for a quick comparison.

All the training charts will be displayed with a legend that indicates the training session.

For more details regarding deploying training sessions, please see Training Vision Models and Training Fusion Models for training Fusion models.
Training Session Details
Click on any training session card to open its details page. The details page provides a deep view into the session through the following tabs:
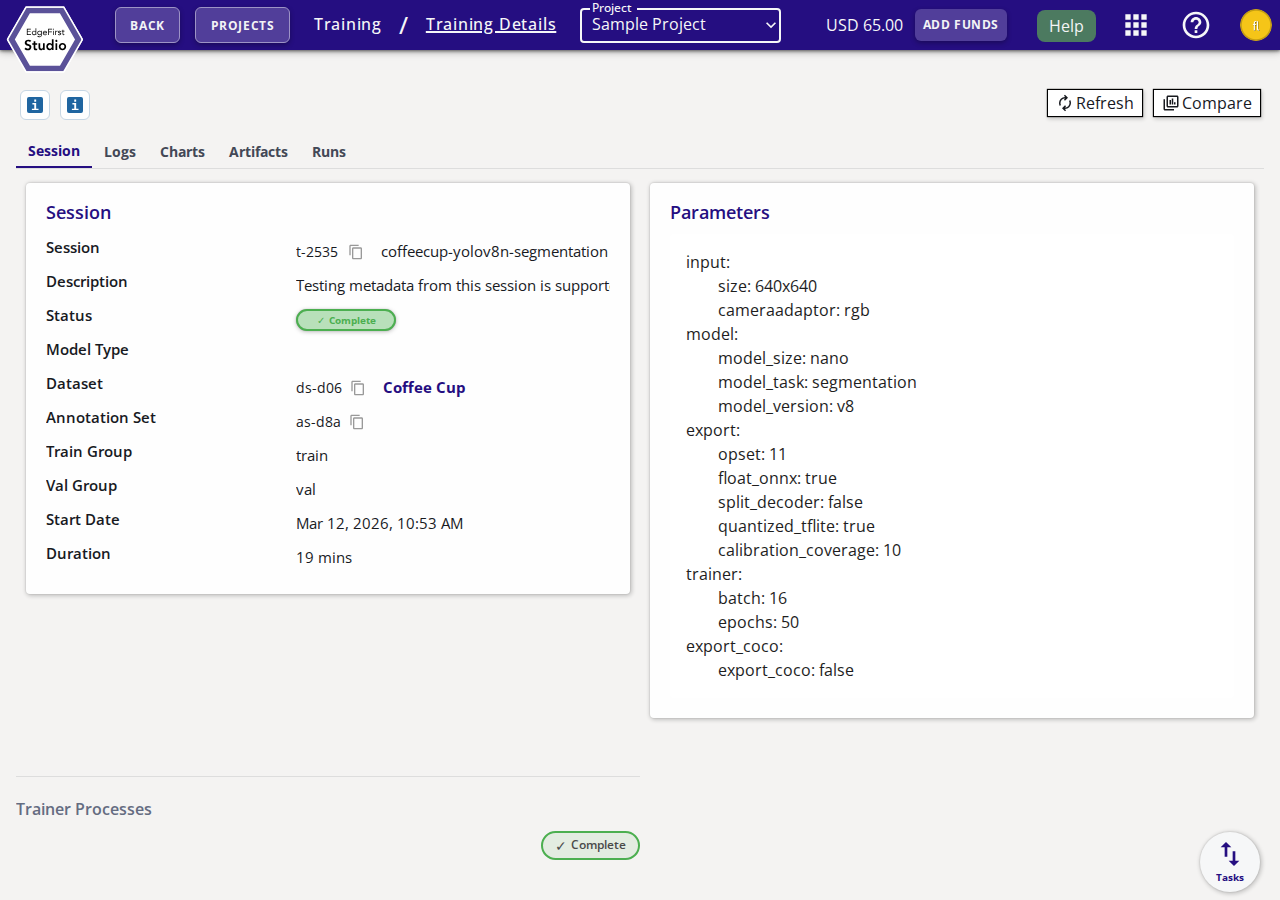
| Tab | Description |
|---|---|
| Session | Summary of the session configuration: session ID, name, description, created by, status, dataset, annotation set, train/val groups, start date, and duration. Also shows the training parameters in YAML format and the status of each trainer process stage. |
| Logs | Live and historical console output from the training process. |
| Charts | Training metrics plotted over epochs, such as loss curves and mAP. |
| Artifacts | Downloadable model artifacts produced by the session (ONNX, TFLite, etc.). Click the download arrow next to any artifact to save it locally. |
| Runs | Individual run attempts within the session, useful when a session was restarted. |
The action bar at the top of the details page provides the following operations:
- Refresh — Reload the session state and latest log output.
- Validate — Create a new validation session for this training session.
- Compare — Compare the training charts of this session against others.
- Stop — Terminate a running training session.
- Recycle Bin — Move the session to the recycle bin.
Cloning a Training Session
Cloning creates a new training session from an existing one. The clone preserves the source session's trainer type, model, dataset selection, and other session configuration, but it overrides two training controls: Use Default Weights is disabled and Enable Training is disabled. Because training is not run, the completed weights from the source session are copied directly into the new session's artifacts.
This is useful when you want to:
- Reuse a trained model as a starting point for fine-tuning with a different dataset.
- Preserve a snapshot of a model at a specific training state before further experimentation.
- Share a model artifact under a new session name without re-running training.
To clone a session, click "clone training session" button on the training card. A dialog will appear pre-filled with the source session's configuration. Adjust the name and description as needed, then confirm.
Note
Cloning is equivalent to creating a new session with Use Default Weights disabled and Enable Training disabled. See Enable Training and Use Default Weights for the full behaviour matrix.
Validation Sessions
The validation sessions will assess the performance of the models in the training sessions. A training session can have any number of validation sessions. From the "Model Experiments" page, we can click on the "Validation Sessions" button with the icon  to see the validation sessions in the experiment. The figure below shows the layout of the validation session cards under the "Validation Sessions" page.

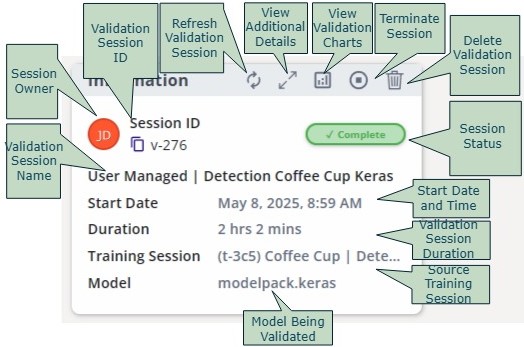
The following figure describes the attributes of any given validation session.
To compare the validation charts of each session, click on "Compare" at the top right corner of the "Validate Sessions" page. This will show the charts of each validation session side-by-side for a quick comparison.

Next select the validation session results you wish to compare. Once selected, click "Compare" to show the validation charts side-by-side.

Now the charts for each session are displayed side-by-side. All the charts for a single training session will be shown in one column. A new column indicates another session.

There are two types of validation: managed and user-managed. Managed validations are set by default in EdgeFirst Studio which triggers an EC2 instance that downloads the dataset and the inference model for validation. This type of validation is best used if you do not have an embedded platform to deploy the model. User-managed validations are hosted in embedded platforms where the dataset and the inference model will be downloaded. This type of validation is best used if you have an embedded platform available to verify how the model would perform in the platform and determine the model's inference time when deployed.
For more details regarding deploying validation sessions, please see Validating Vision Models and Validating Fusion Models for validating Fusion models.
Validation Session Details
Click on any validation session card to open its details page. The details page provides the following tabs:
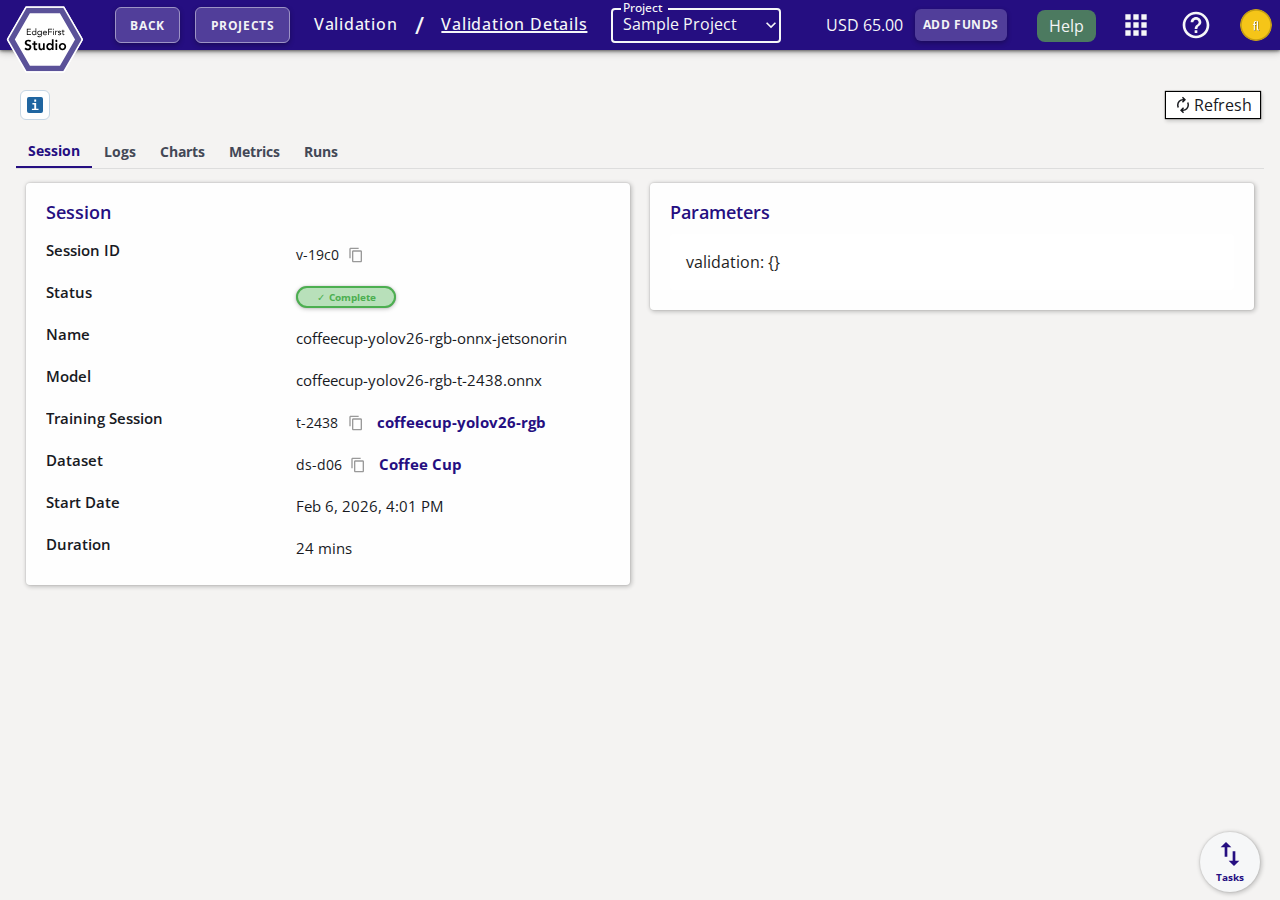
| Tab | Description |
|---|---|
| Session | Summary of the session: session ID, status, name, model used, linked training session, dataset, start date, and duration. Also shows the validation parameters in YAML format. |
| Logs | Console output from the validation run. |
| Charts | Validation metric charts such as precision-recall curves. |
| Metrics | Tabular accuracy metrics (mAP, AP per class, etc.) from the completed validation run. |
| Runs | Individual run attempts for this session. |
The action bar at the top of the details page provides the following operations:
- Refresh — Reload the session state and latest output.
- Stop — Terminate a running validation session.
- Recycle Bin — Move the session to the recycle bin.
Running a model
EdgeFirst Studio allows you to run trained models directly in the web browser. After a model has been trained, open the model details page by clicking on the trainer card. Only models trained on ModelPack are supported for live running. From there, click the Run Model button to start running the model.

This will open the model runner dashboard.
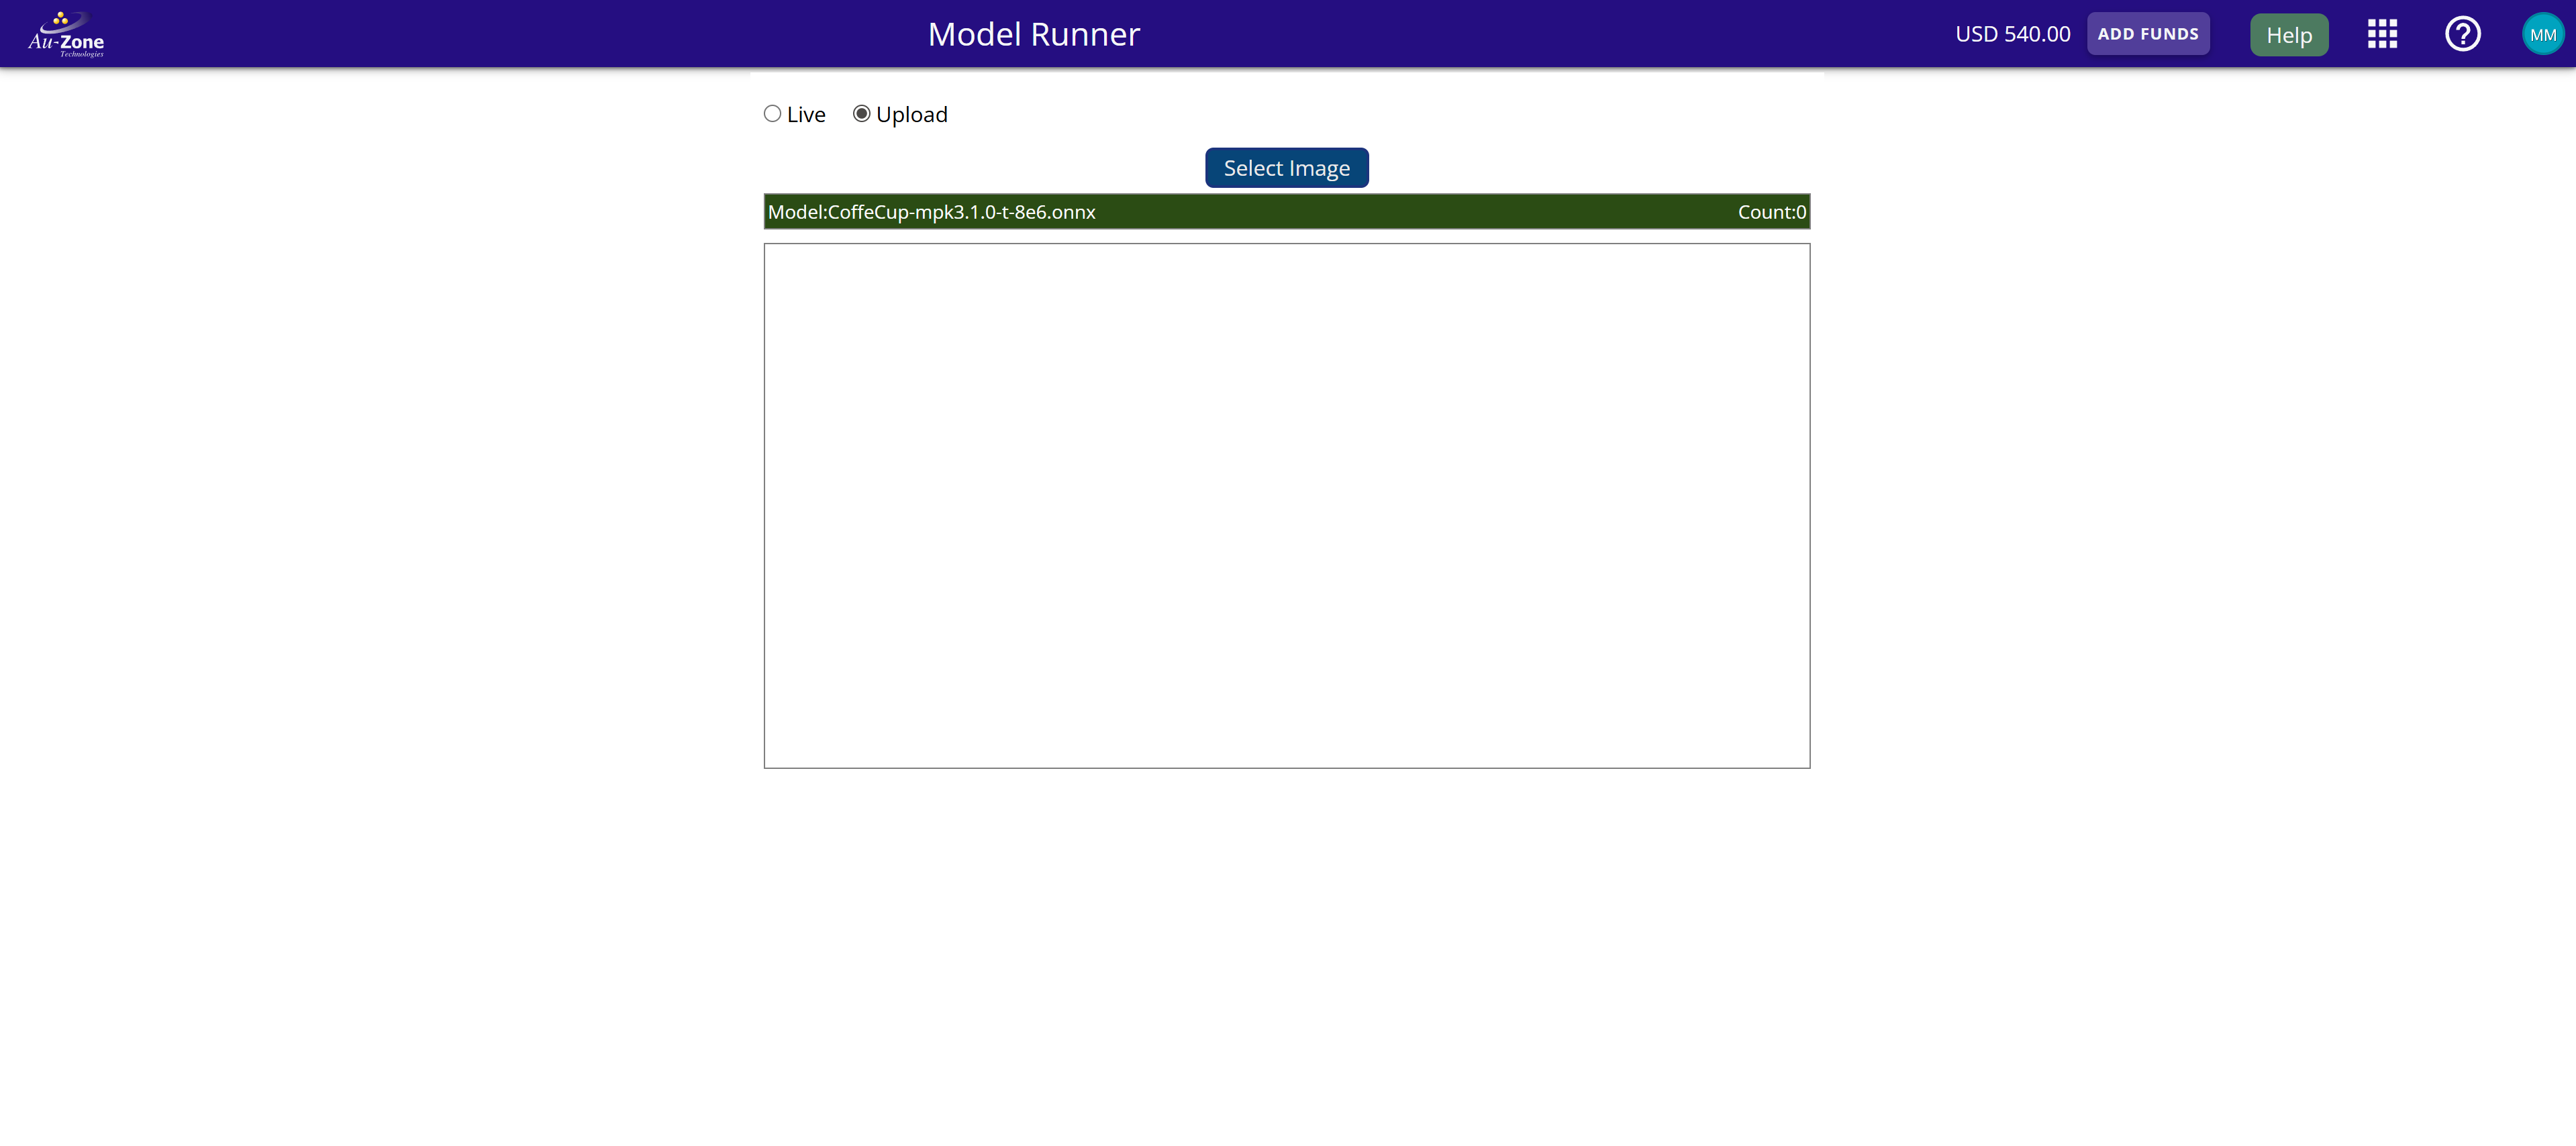
Please wait while the model loads. This may take up to 60 seconds, depending on the model size. Once the model is loaded, select a mode: Live to run the model on images from a camera stream, or Upload to choose a file from local storage.
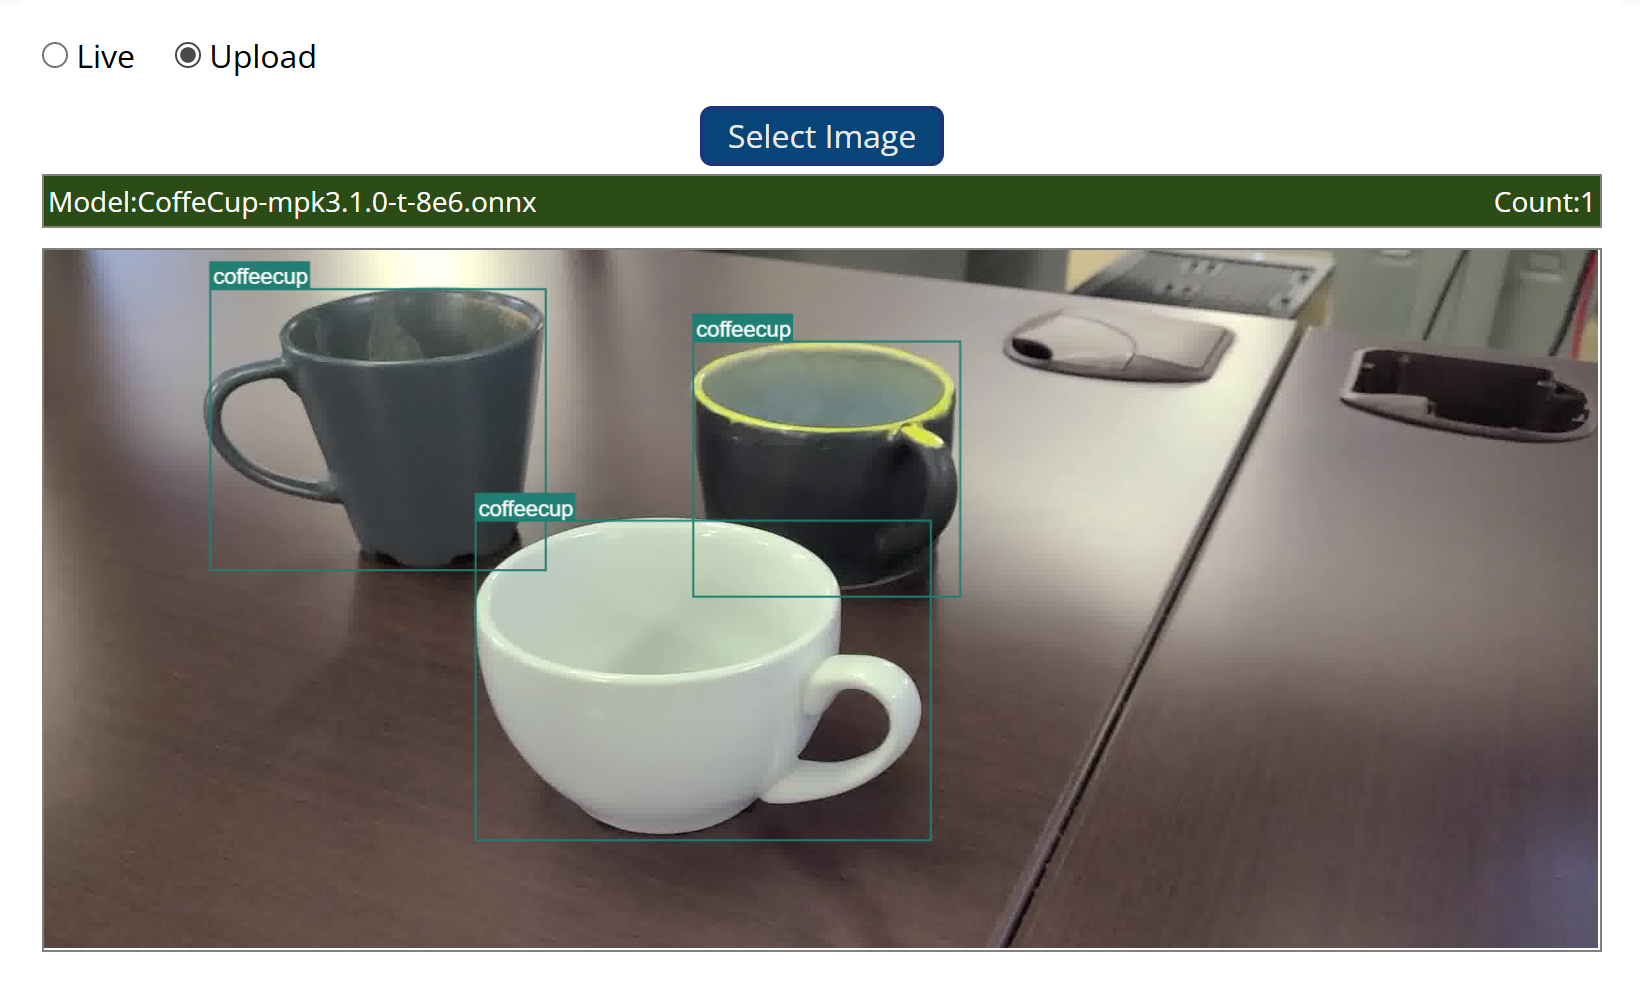
The model will run automatically, and the results will be displayed on the screen. The output (segmentation or detection) depends on the type of model being used.
The count shows the number of iterations of model runner.
Next Steps
Now that you are familiar with the layout of the Model Experiments Dashboard, proceed to the next section for learning more about the context of the Cloud Instances Dashboard.